Managing Front Desk Shifts
Learn how to start, monitor, and close shifts at the front desk, including cash reconciliation and handover notes.
What Are Front Desk Shifts?
Front Desk Shifts allow your property to track which staff member is responsible at any given time. Each shift records: • WHO is on duty (staff member name and start time) • CASH OPENING BALANCE when the shift begins • ALL TRANSACTIONS made during the shift (payments, refunds) • PAYMENT BREAKDOWN by method (cash, card, online) • HANDOVER NOTES for the next shift • NIGHT AUDIT flag if the shift covers the end of day Shifts help with: - Accountability: Know exactly who was on duty when an event occurred - Cash management: Track cash receipts and closing balance - Handovers: Ensure the incoming team knows about pending issues - Reporting: Shift-based performance and revenue summaries You can have MULTIPLE concurrent shifts if your property runs overlapping schedules.

Starting a New Shift
To start a new shift from the Front Desk Dashboard: 1. Navigate to the FRONT DESK page (the main dashboard icon in the sidebar) 2. Look at the TOP SHIFT STRIP — it shows active shifts 3. If no shift is active, click the 'START SHIFT' button 4. A dialog opens with two steps: STEP 1 — Select Shift Template - Choose a preconfigured shift template (Morning, Evening, Night, etc.) - OR enter a custom shift name if you don't use templates - Shift templates can be configured in Settings → Team Management STEP 2 — Set Opening Cash Balance - Enter the physical cash amount in the till - This becomes the baseline for cash reconciliation at shift end - 0 is acceptable if no opening cash is present 5. Click START SHIFT to activate the shift 6. Your name and shift start time now appear in the Shifts strip at the top 7. The shift runs until you or a manager clicks END TIP: Multiple staff members can have concurrent shifts running. Each person's shift is tracked independently.
The Active Shift Strip
When a shift is running, the SHIFTS STRIP at the top of the Front Desk page shows: • SHIFT ICON (clock) — confirms shift tracking is active • STAFF PILLS — one colored pill per active shift, showing: - First name of the staff member - Shift start time - A colored dot matching the shift template color • END BUTTON — next to each active shift to close it The shift strip is always visible so you can see at a glance: - Who is currently on duty - How long each shift has been running - Whether you need to check in or hand over IF NO SHIFTS ARE ACTIVE: - The strip shows 'Start Shift' button - No staff accountability is currently tracked - Recommend always having an active shift during operational hours SHIFT TEMPLATE COLORS: Each shift template has a unique color (blue, green, amber, red, purple, cyan) so multiple concurrent shifts can be easily distinguished in the strip.
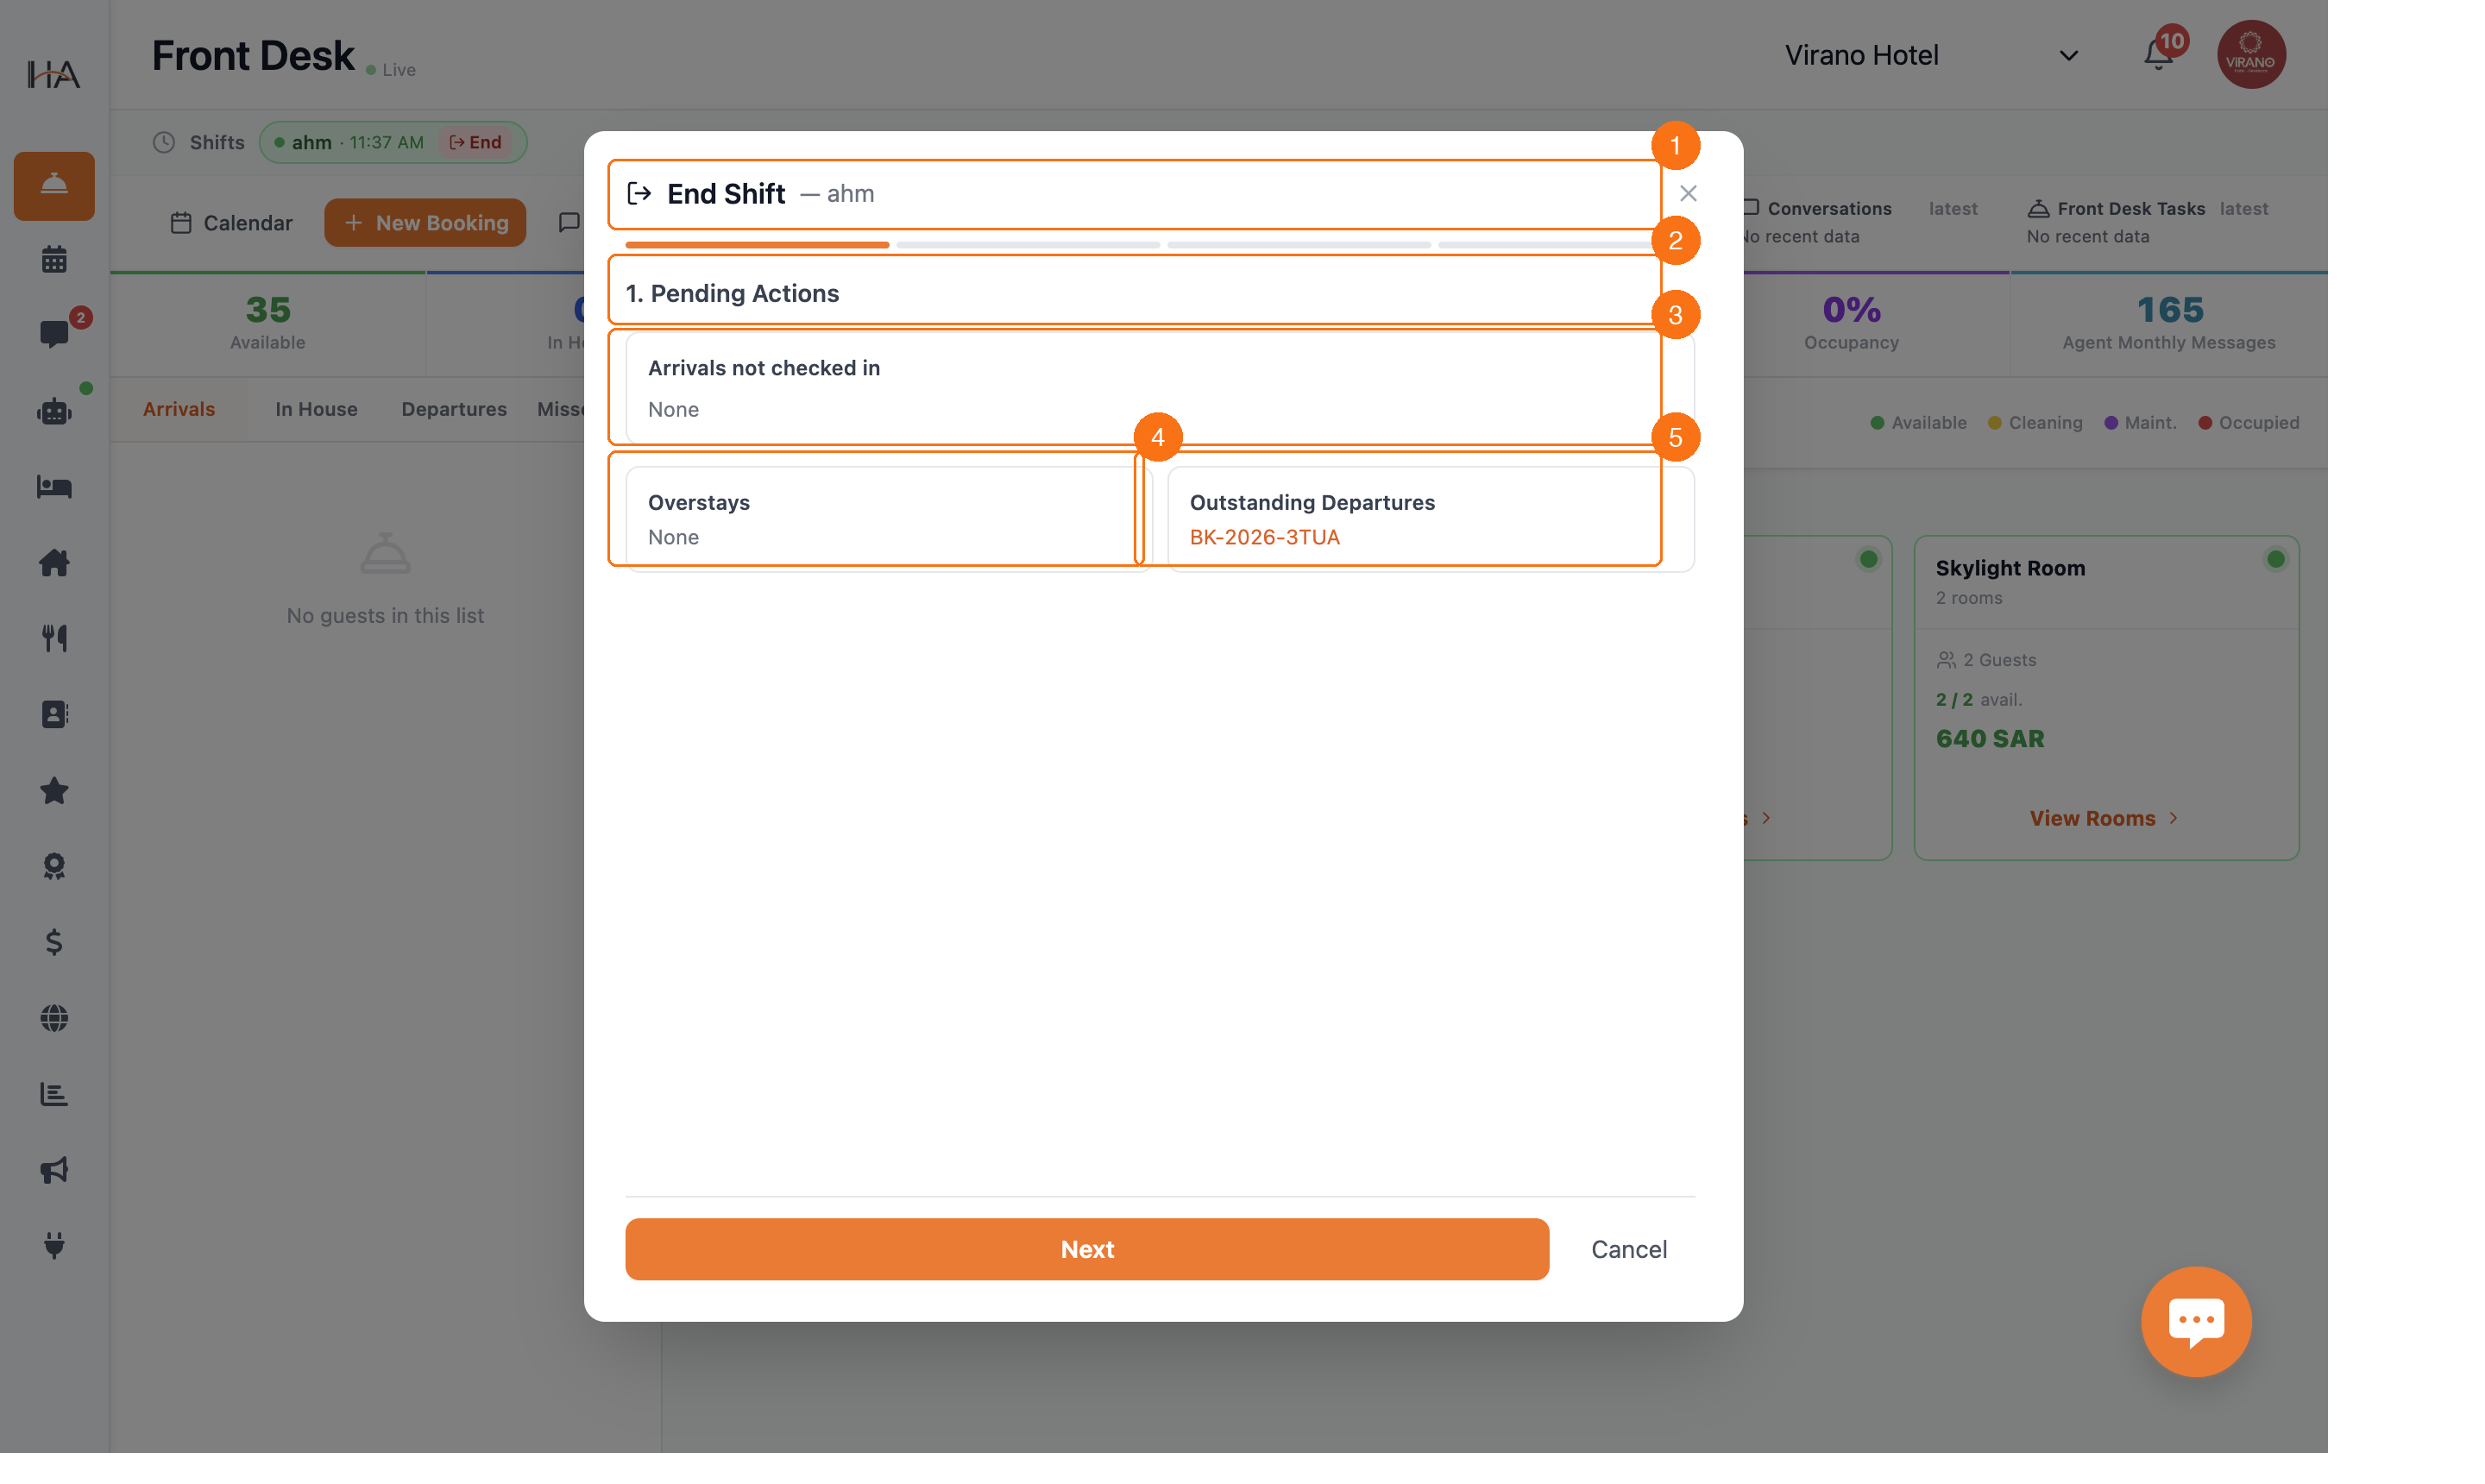
Ending a Shift — Pending Actions (Step 1)
To end an active shift, click the END button next to your shift in the Shifts strip. A multi-step dialog opens: STEP 1 — PENDING ACTIONS This step shows tasks that may need attention before handing over: • ARRIVALS NOT CHECKED IN: - Lists any guests who were expected to arrive during your shift but haven't checked in yet - 'None' means all arrivals are accounted for - If any are listed, you should note them in the handover • OVERSTAYS: - Guests who were supposed to check out but are still in their room - These need resolution before or during handover • OUTSTANDING DEPARTURES: - Bookings that should have checked out but haven't processed payment or left - Shows booking reference numbers (e.g., BK-2026-3TUA) - Click on a booking number to open its details and resolve the issue REVIEW THESE carefully and take action or note them before proceeding. Click NEXT to continue to cash reconciliation.
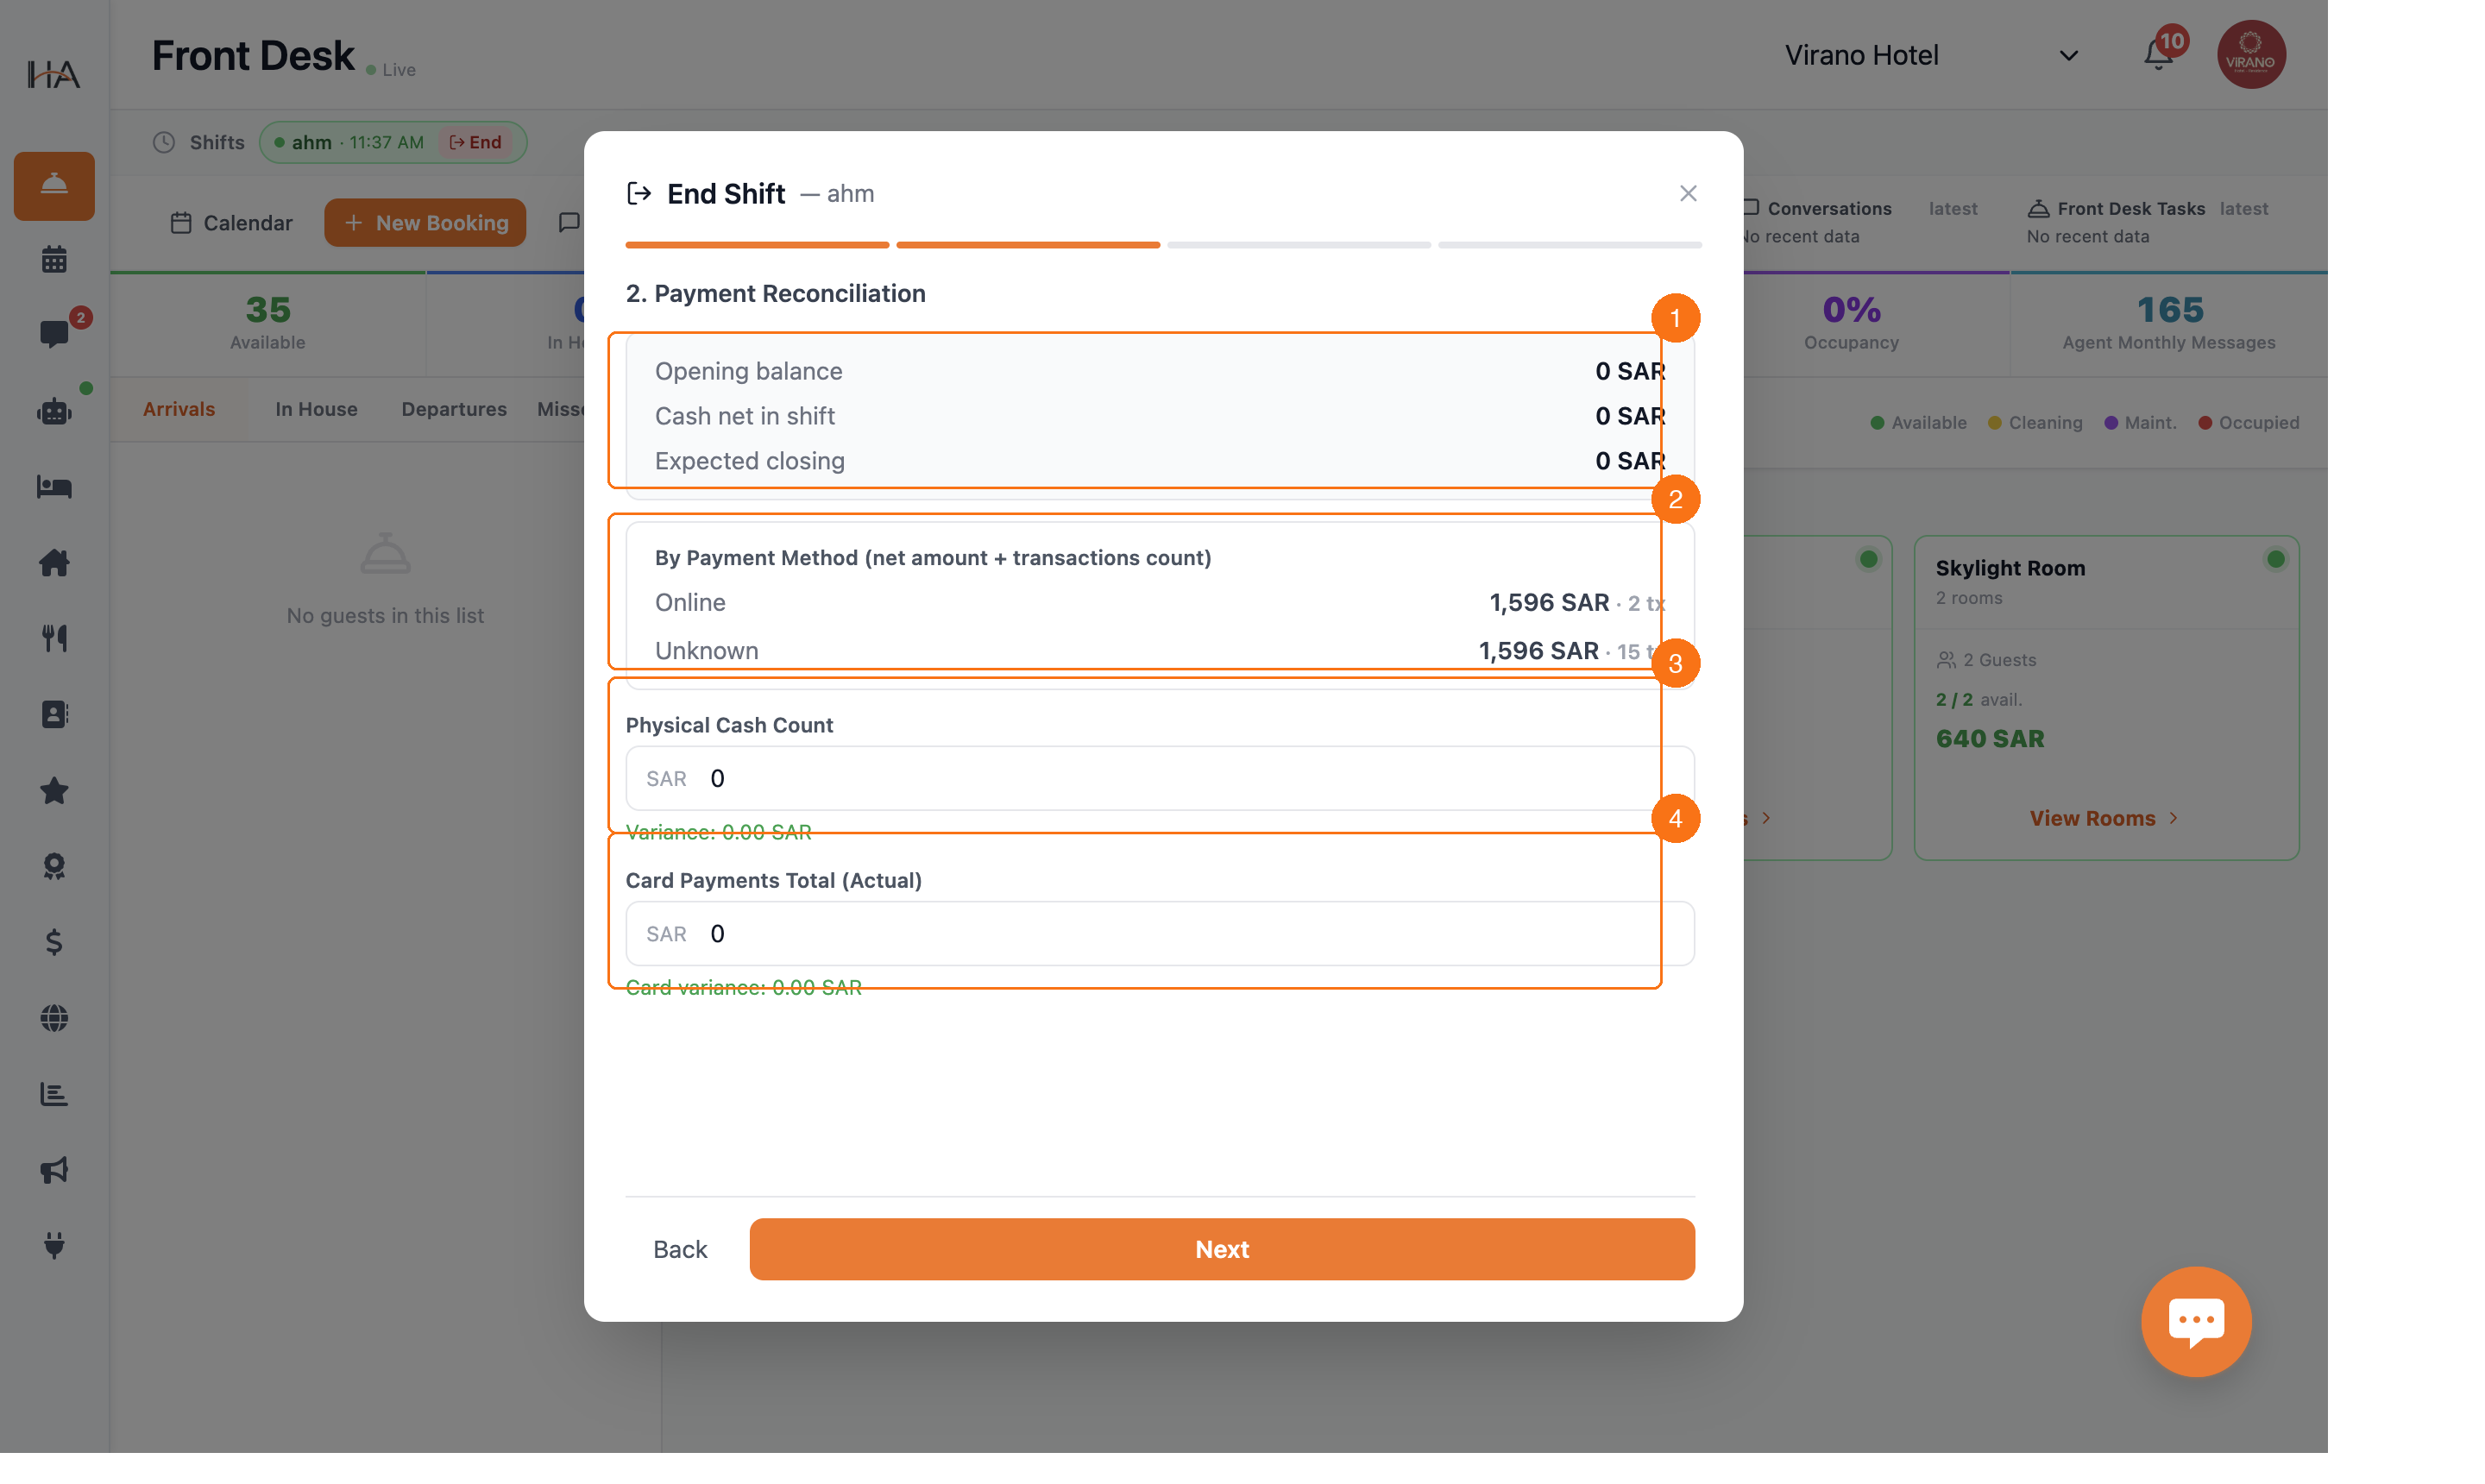
Ending a Shift — Cash Reconciliation (Step 2)
STEP 2 — PAYMENT RECONCILIATION This step verifies that all payments during your shift match the physical cash in hand. SYSTEM SUMMARY (auto-calculated): • Opening balance — Cash amount entered at shift start • Cash net in shift — Total cash received minus refunds during your shift • Expected closing — What the system expects to be in the till BY PAYMENT METHOD: A breakdown of all transactions grouped by payment type: • Online payments — Transactions processed digitally • Cash — Physical cash received (card, bank transfer, etc.) • Unknown — Any transactions without a specific payment method Each line shows the sum and transaction count YOUR INPUTS: 1. PHYSICAL CASH COUNT — Enter the actual cash you count in the till - Variance shows the difference between expected and actual - Positive variance = more cash than expected (over) - Negative variance = less cash than expected (short) 2. CARD PAYMENTS TOTAL — Enter the actual card terminal total - Compare with system's recorded card transactions After entering both values, click NEXT to proceed to handover notes.
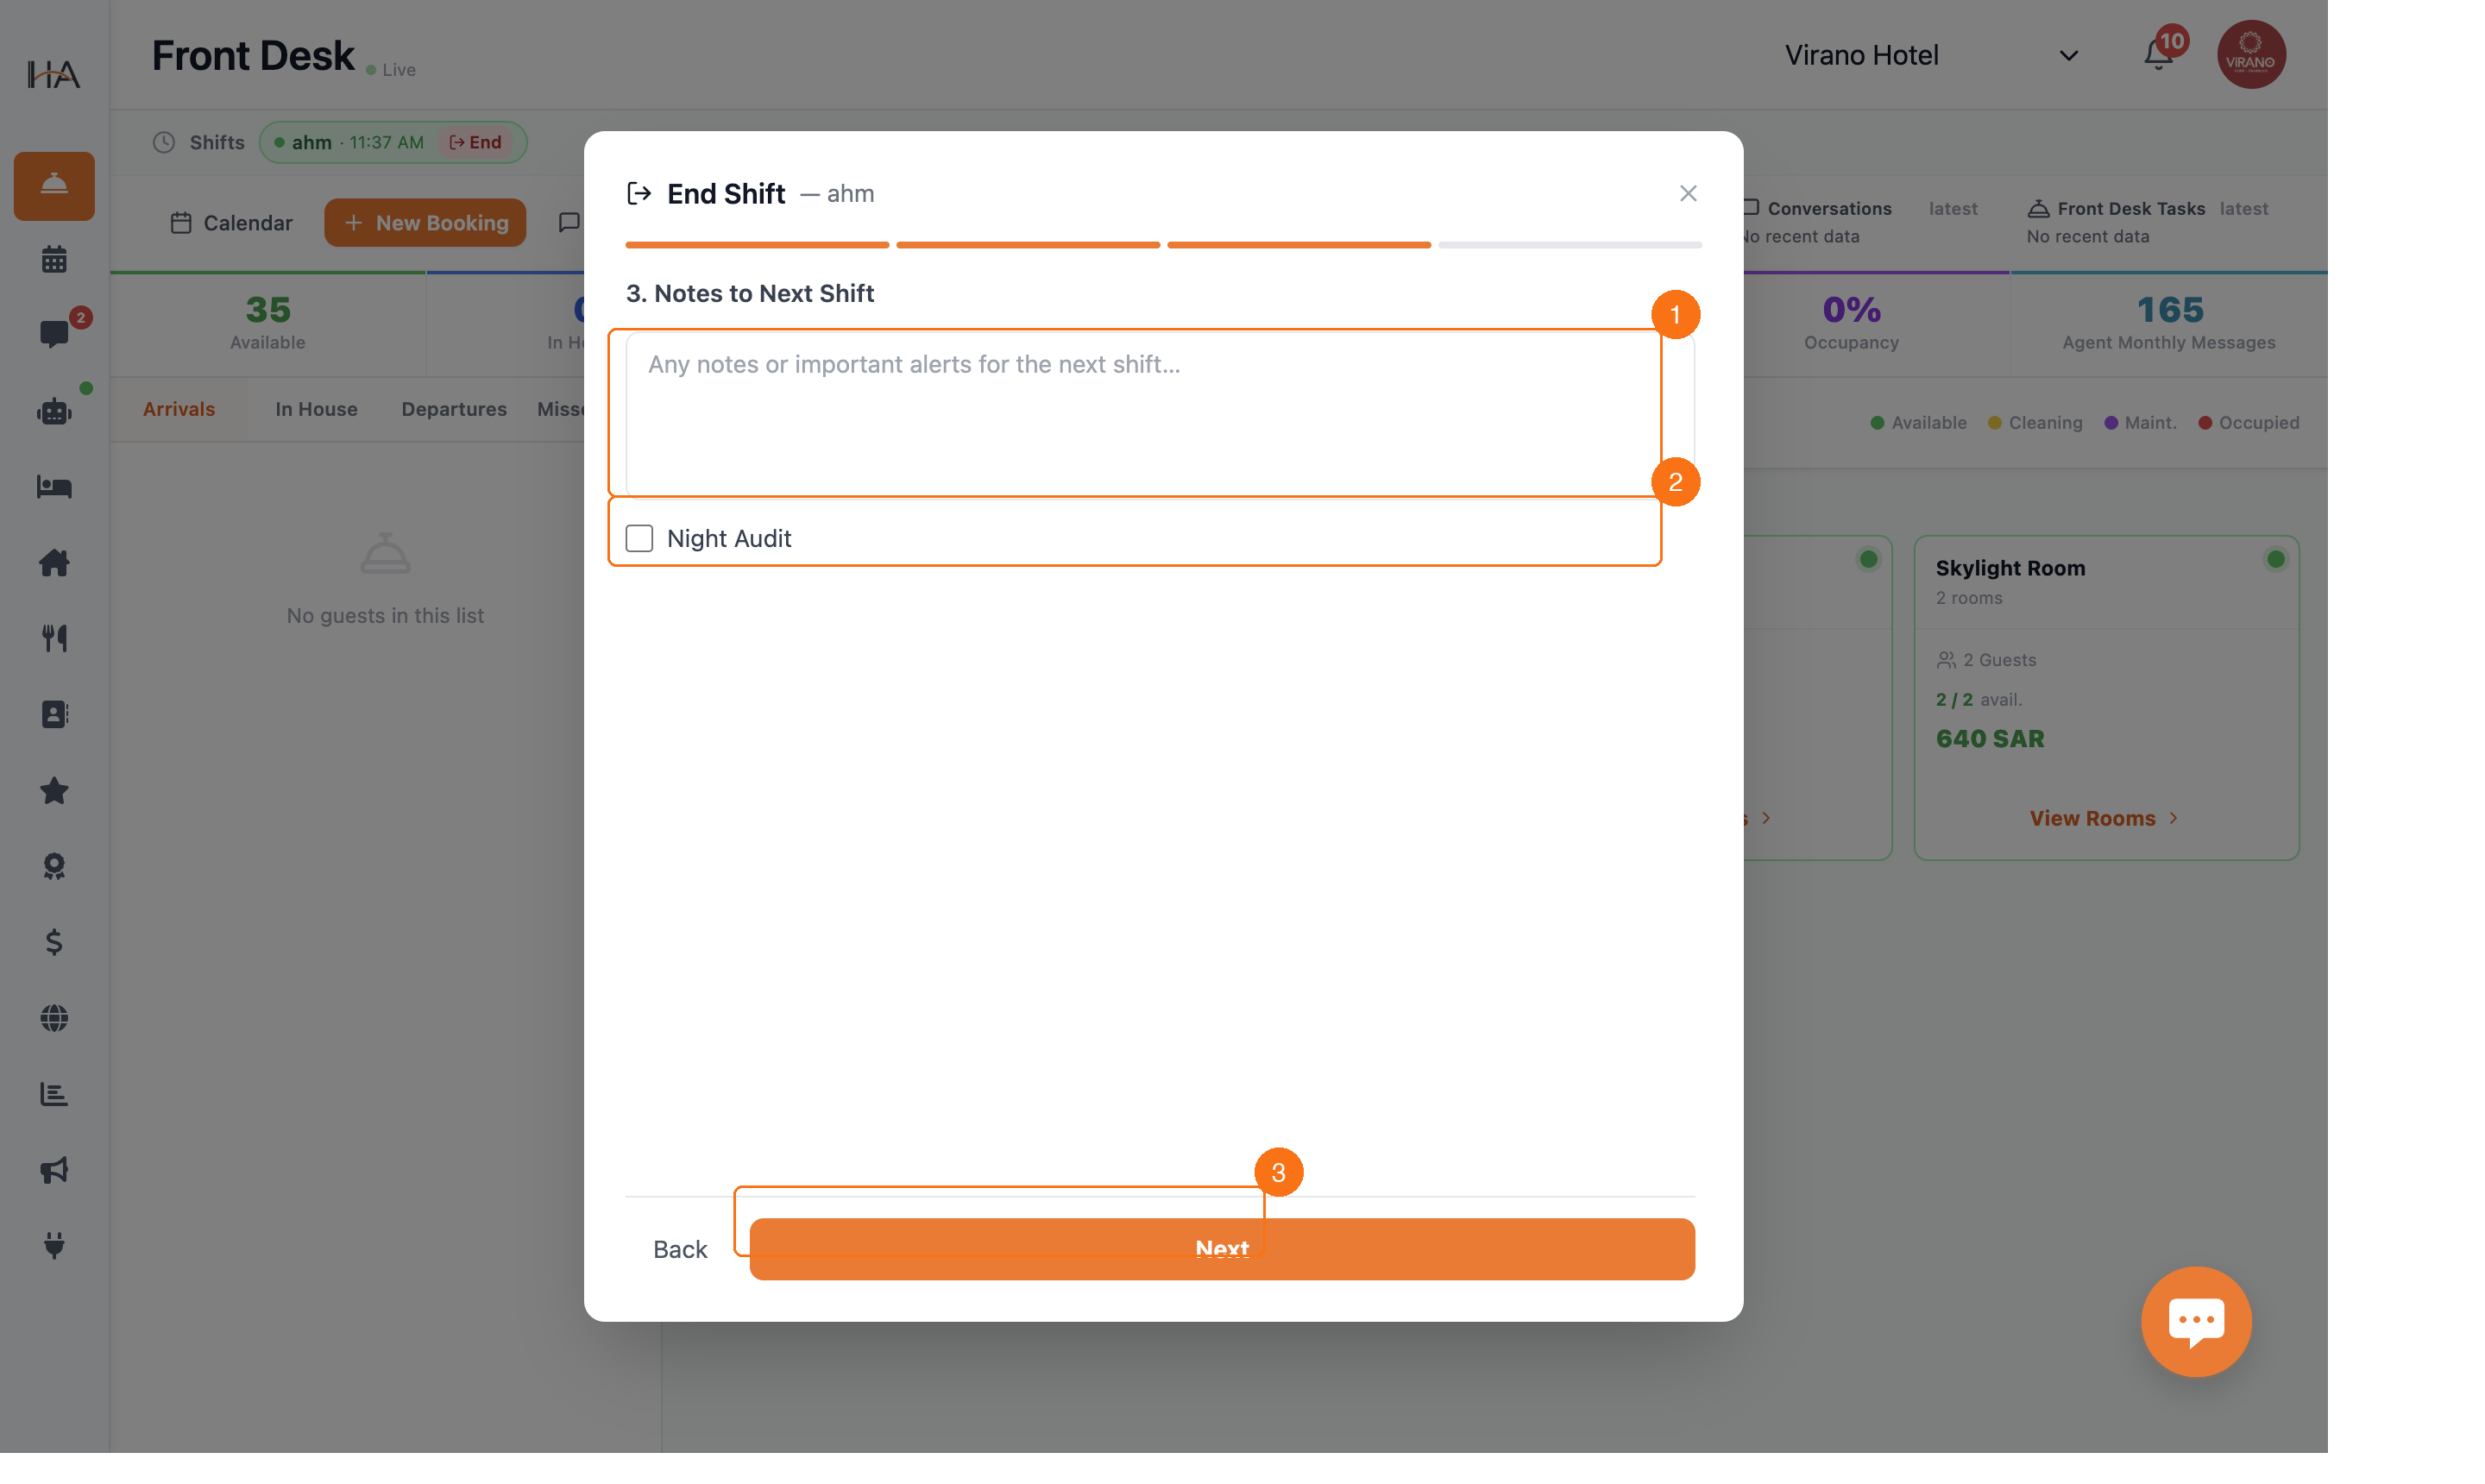
Ending a Shift — Handover Notes (Step 3)
STEP 3 — NOTES TO NEXT SHIFT Before fully closing your shift, you can leave critical information for the incoming team: • NOTES TEXT FIELD: - Enter any important updates, pending tasks, or guest situations - Examples: 'Room 205 AC reported as not working — maintenance called', 'VIP guest checking in tomorrow at 9am — prepare welcome package' - These notes are permanently saved with the shift record - Previous shift handover notes can be viewed in Shift History • NIGHT AUDIT CHECKBOX: - Mark this if your shift includes the end-of-day accounting reconciliation - Night audit shifts have special reporting and can only be marked once per day - This flag helps distinguish regular shifts from the overnight accounting process After adding notes, click NEXT to review the shift summary and confirm closing. ACCESSING SHIFT HISTORY: All completed shifts and their notes can be reviewed in Team Management → Shift History. This provides a full audit trail of who was on duty, what happened, and what cash was handled.
More in Front Desk
Understanding Front Desk Tasks
Learn about the Front Desk task management system, how it helps organize daily operations, and how it integrates with your staff.
Creating and Managing Front Desk Tasks
Learn how to create new tasks, assign them to team members, and progress them through completion.
Task Priorities and Status Workflow
Master the four task priority levels and understand how tasks flow through Open, In Progress, and Done statuses.
Task Details and Booking Integration
Explore the task creation form in depth, and learn how tasks can be linked to guest bookings and room service requests for full context.