Contacts & CRM — Your Guest Database
The Contacts page is your guest customer database (CRM). It collects everyone who has booked, messaged, or been added manually — with bookings, spending, and tags in one place.
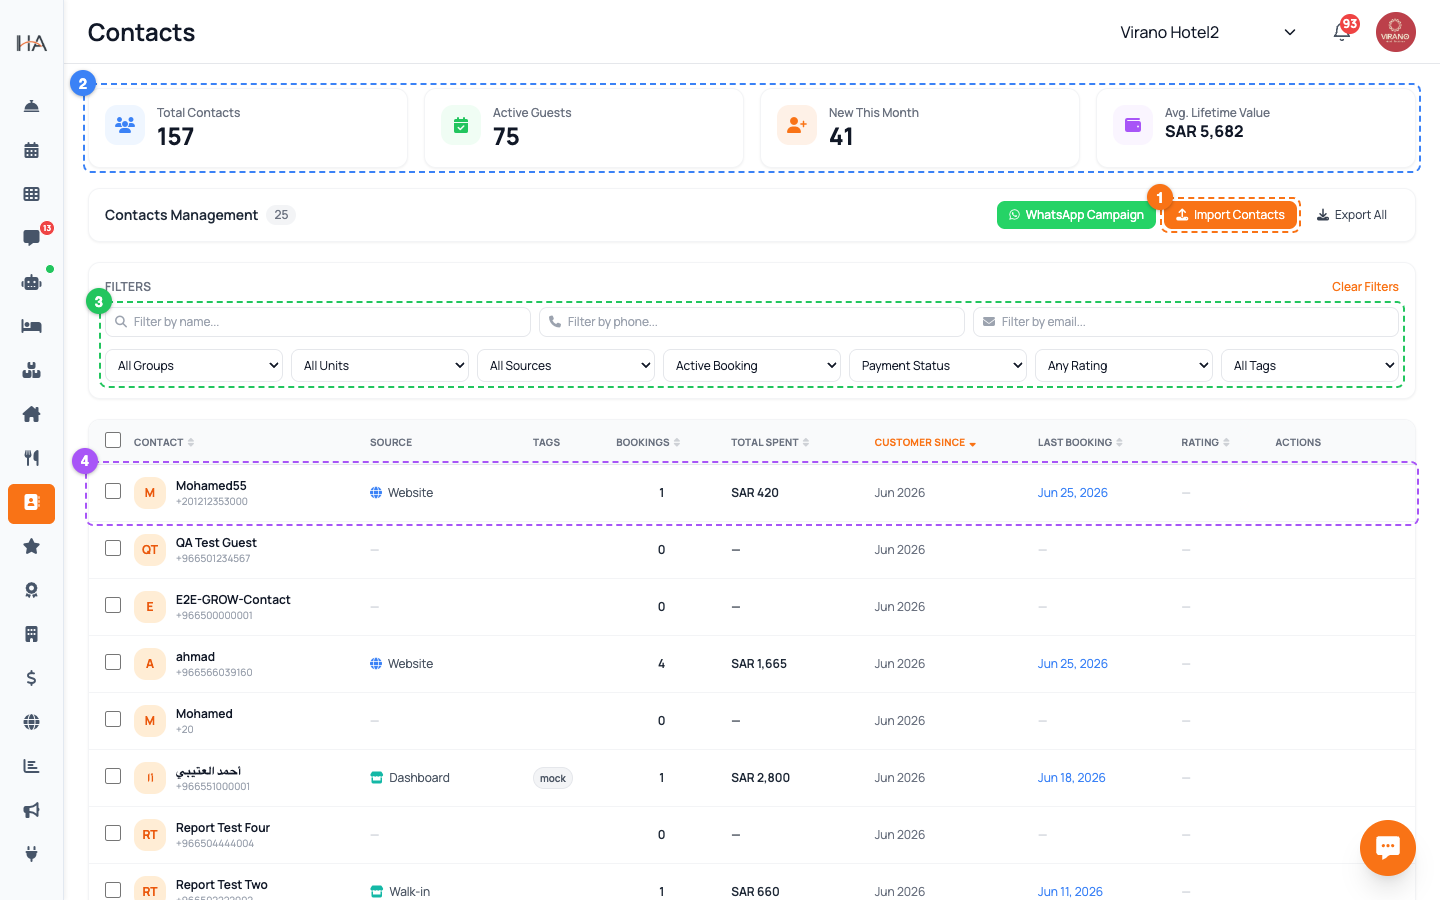
Open the Contacts Page
Click Contacts in the left sidebar menu. The page opens showing four summary cards at the top, an action bar, a filter panel, and a table of every guest in your database. At the very top you'll see four KPI cards: - Total Contacts: everyone in your database - Active Guests: guests with a current/upcoming booking - New This Month: contacts added in the current month - Avg. Lifetime Value: average total spend per guest These cards give you an instant health-check of your guest list before you scroll down to the table.
How Contacts Get Created Automatically
Most contacts appear by themselves — you rarely need to add them by hand. A contact is created automatically whenever: - A guest completes a booking on your website - You create a booking from the dashboard (walk-in or phone) - A guest messages your AI agent on WhatsApp, Instagram, Facebook, Telegram, or Live Chat - A booking arrives from a channel like Booking.com through the Channel Manager Each contact stores the guest's name, phone, and email, and remembers where they first came from (the Source). This means your guest list builds itself as your property operates.
Read the Contacts Table
Each row is one guest. The columns show: - Contact: avatar with initials, name, and phone number - Source: an icon and label showing where they came from (WhatsApp, Website, Walk-in, AI Agent, etc.) - Tags: labels like VIP or Regular - Bookings: total number of bookings made - Total Spent: lifetime spending in your currency - Customer Since: the month they first joined - Last Booking: the date of their most recent stay (click it to open that booking) - Rating: their latest review star rating Click any guest's name to open their full profile drawer.
Sort and Browse the List
Click any column header with the sort arrows to reorder the list — for example: - Sort by Total Spent to find your highest-value guests - Sort by Bookings to see your most loyal repeat guests - Sort by Customer Since to see your newest contacts - Sort by Rating to find your happiest reviewers Click the same header again to flip between ascending and descending. By default the list shows your newest contacts first. The list loads 25 guests at a time — scroll to the bottom and click Load More (25) to bring in the next batch.
Add a Guest Manually
Need to add a guest who walked in or called? Use the import tool: 1. Click the orange Import button in the action bar at the top right. 2. In the panel that slides in, switch to the Add Manual tab. 3. Enter the Phone Number (required) and optionally the Contact Name and Email. 4. Choose the Group (property) the contact belongs to (required). 5. Click Add Contact. The system blocks duplicates — if the phone number already exists, you'll see a warning instead of a duplicate record.
Quick Actions on Each Guest
Hover over any row to reveal quick-action icons on the right: - WhatsApp (green): opens a chat with that guest's number in a new tab - Pencil (edit): change the guest's name, phone, email, or assigned property - Trash (delete): permanently remove the contact (only if your role allows it) Deleting asks for confirmation first. Be careful — a deleted contact and its CRM notes cannot be recovered, though past bookings remain in your reports.
Who Can See and Edit Contacts
Access depends on the role assigned to each team member: - Viewing contacts requires the View Contacts permission — without it, the page shows an access-denied message. - Importing and exporting require the Import/Export permission. - Deleting requires the Delete Contact permission, so the trash icon and bulk-delete button only appear for allowed roles. - Sending a WhatsApp Campaign requires Marketing campaign permission. If a button is missing for you, your role doesn't include that action — ask your owner or manager to adjust your role in the Team settings.
More in Contacts & CRM
Contact Profiles — The Full Guest View
Click any guest to open their profile drawer: contact details, lifetime stats, full booking history, loyalty tier, tags, and private staff notes — all in one slide-out panel.
Conversations & Shared Inbox — Talking to Guests
See where each guest came from, reach them on WhatsApp in one click, and understand how your guest messages flow in through the AI agent channels.
Tags, Segments, Import & Export
Organize your guest list with tags, filter it into focused segments, and move contacts in and out using CSV import and export.