Contact Profiles — The Full Guest View
Click any guest to open their profile drawer: contact details, lifetime stats, full booking history, loyalty tier, tags, and private staff notes — all in one slide-out panel.
Open a Guest Profile
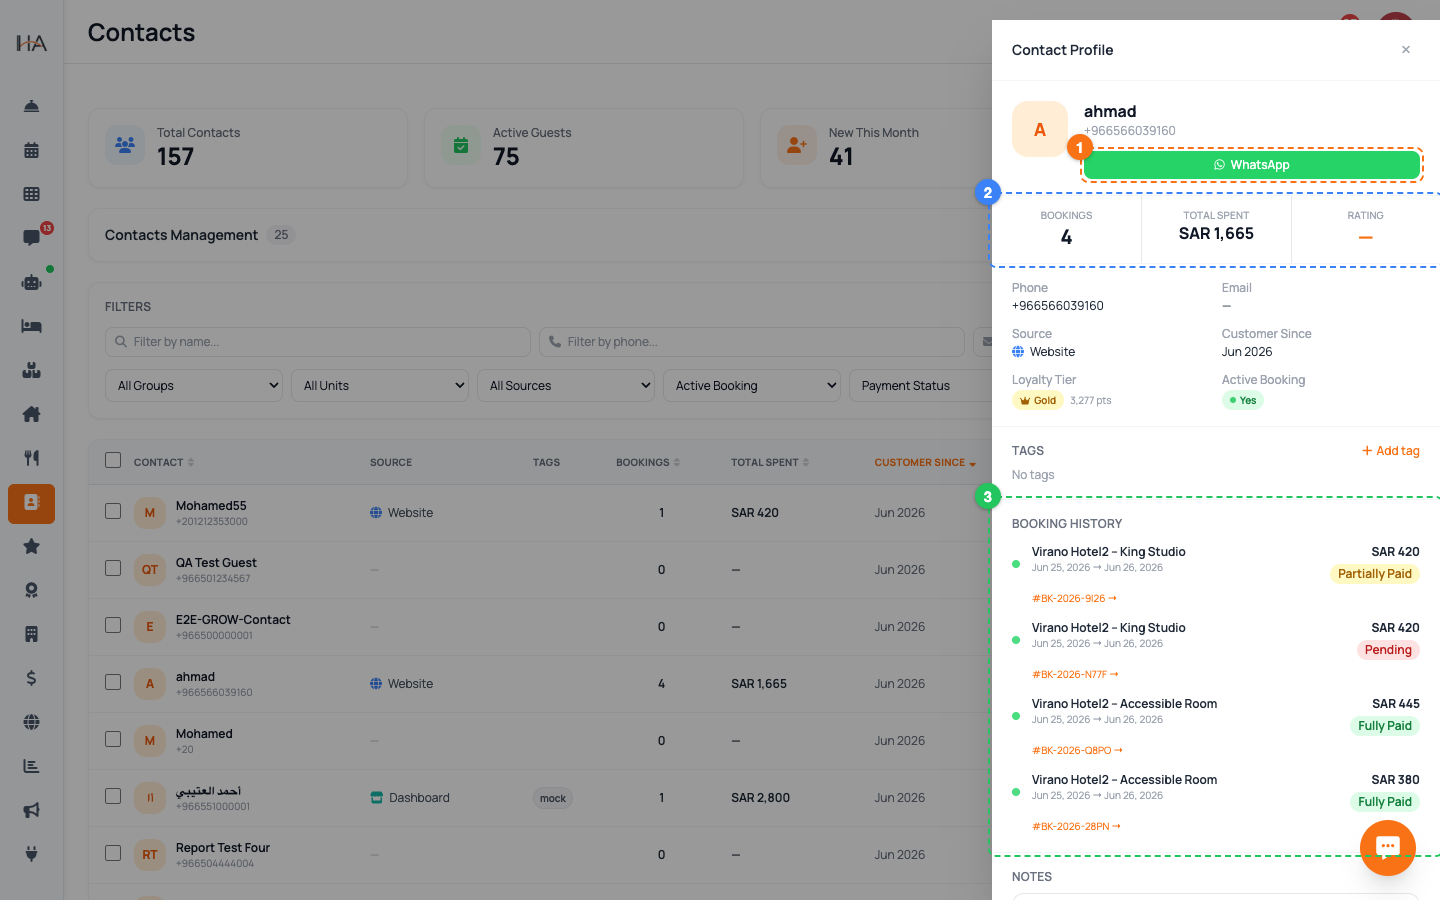
From the Contacts table, click the guest's name (next to their colored initials avatar). A panel labeled Contact Profile slides in from the side. At the top you'll see: - The guest's avatar, name, and phone or email - Their current tags as small colored badges - Two quick buttons: a green WhatsApp button (opens a chat) and an Email button (opens a new email), shown only when that detail exists Close the panel anytime with the X in the top corner or by clicking the dark area outside it.
Read the Lifetime Stats Strip
Just below the name is a three-box strip summarizing the guest's value to your property: - Bookings: how many times they've booked with you - Total Spent: their lifetime spending, shown in your property currency - Rating: their latest review star score These numbers update automatically from real bookings and reviews — you never type them in. Use them to instantly recognize a high-value or repeat guest before you greet them or offer a deal.
Check Contact Details and Loyalty
The details grid shows the core facts about the guest: - Phone and Email - Source — the channel they originally came from - Customer Since — the month they joined - Loyalty Tier — a colored crown badge (Bronze, Silver, Gold, or Platinum) with their current points, shown only if the guest is enrolled in your loyalty program for the selected property - Active Booking — a green "Yes" badge if they currently have a live stay, otherwise "No" This section is read-only; to change the name, phone, or email use the pencil edit icon back in the table.
Manage the Guest's Tags
In the Tags section you can label the guest for fast filtering later: 1. Click Add tag to open the picker. 2. Choose from the preset labels: - ⭐ VIP — your most important guests - 🔁 Regular — frequent repeat guests - ⚠️ No-show — guests who failed to arrive - 🆕 New — first-time guests - 💬 High Engagement — very active chatters 3. Click a tag to add it; click an existing tag (with the × ) to remove it. Tags save instantly — no separate save button is needed.
Review the Full Booking History
The Booking History section lists every stay this guest has ever made — not just the latest one. Each entry shows: - A colored status dot (green = Confirmed, blue = Checked In, gray = Checked Out, red = Cancelled, orange = No Show, yellow = Pending) - The property and unit name - Check-in → check-out dates - The final price and a payment-status badge (Fully Paid, Partially Paid, Pending, or Refunded) Click the orange booking reference (e.g. #1042 →) on any entry to open that booking's full details in a side panel without leaving the profile.
Add Private Staff Notes
At the bottom of the profile is a Notes box for internal staff memory — things your team should know but the guest never sees. For example: - "Prefers a high floor away from the elevator" - "Allergic to feather pillows" - "Always asks for a late checkout" - "Repeat complaint about noise — handle with care" Type your note and click Save Note. The note stays attached to this guest across all future visits, so any team member opening the profile sees the same context.
Edit Core Contact Details
The profile drawer shows information but doesn't let you rename the guest. To change core details: 1. Close the profile drawer. 2. Hover over the guest's row in the table and click the pencil (edit) icon. 3. In the edit window, update the Name, Phone, Email, or the property/unit the contact is linked to. 4. Click Save. Keep phone numbers accurate and in international format (for example +9665...) so WhatsApp quick-actions and campaigns reach the right person.
More in Contacts & CRM
Contacts & CRM — Your Guest Database
The Contacts page is your guest customer database (CRM). It collects everyone who has booked, messaged, or been added manually — with bookings, spending, and tags in one place.
Conversations & Shared Inbox — Talking to Guests
See where each guest came from, reach them on WhatsApp in one click, and understand how your guest messages flow in through the AI agent channels.
Tags, Segments, Import & Export
Organize your guest list with tags, filter it into focused segments, and move contacts in and out using CSV import and export.