Tags, Segments, Import & Export
Organize your guest list with tags, filter it into focused segments, and move contacts in and out using CSV import and export.
Find the Filters Panel
Just above the table is the Filters panel. It lets you narrow thousands of contacts down to the exact group you care about. The top row has three search boxes: - Search by Name - Search by Phone - Search by Email Type in any of them and the list narrows as you go. An orange counter badge next to the word Filters shows how many filters are currently active, and a Clear Filters link resets everything in one click.
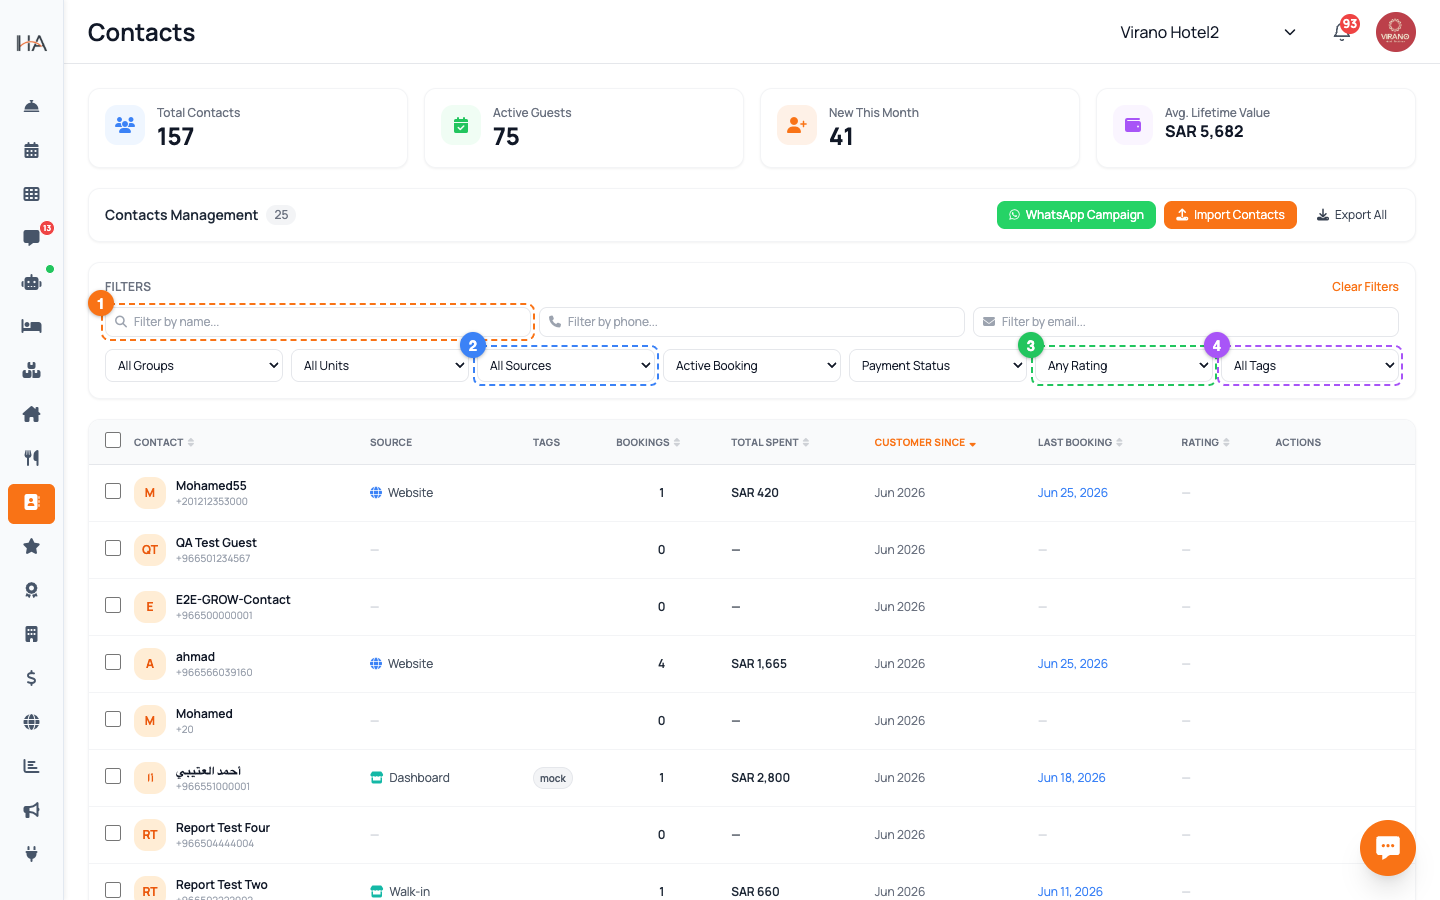
Filter by Tag to Build a Segment
Use the Tags dropdown in the filter row to instantly create a segment of guests sharing the same label: - ⭐ VIP — pull up your most important guests before a busy weekend - 🔁 Regular — find loyal repeat guests for a thank-you offer - ⚠️ No-show — review guests who didn't arrive - 🆕 New — welcome first-time guests - 💬 High Engagement — guests who chat with you a lot Select one tag and the table shows only those guests. Combine it with other filters to get even more specific.
Filter by Property, Source, Payment & Rating
The second row of dropdowns lets you slice your list many ways: - Group: show only guests of a specific property - Unit: narrow to a single unit within that property - Source: filter by where they came from (WhatsApp, Website, Walk-in, AI Agent, etc.) - Active Booking: show only guests with — or without — a current stay - Payment Status: Fully Paid, Partially Paid, Pending, or Refunded - Rating: 3+, 4+, or 5 stars only Filters stack together, so you can build a precise segment like "VIP guests of Virano Hotel who are 5-star reviewers."
Export Your Contacts to CSV
Export turns your list into a spreadsheet file you can open in Excel or Google Sheets: - Export All: click the Export All button in the action bar to download every contact currently shown (your filters apply). - Export Selected: tick the checkboxes for specific guests, then click the Export (N) button to download just those. The file includes name, phone, email, source, total bookings, total spent, last group/unit, last booking date, rating, tags, and payment status. Use it for offline backups, accountant reports, or building a marketing list. Export requires the Import/Export permission.
Import Contacts from a CSV File
Bringing in a list (for example from an old system) takes two simple steps: 1. Click the orange Import button, and on the Import by CSV tab click Download Template to get the correctly formatted file. 2. Fill the template with your guests (Name, Phone, Email), then click Select CSV File and upload it. Before importing you must also choose a Group to assign all the imported guests to — this field is marked with a red star and is required. The file must be a .csv and under 5MB.
Review the Validation Preview
After you upload, the system checks every row before saving anything. You'll see three counters: - Valid (green) — rows ready to import - Invalid (red) — rows with a problem - Total — everything in the file Common reasons a row is marked invalid: - Missing phone number (phone is required) - A phone number that's too short or too long - A duplicate phone already in your contacts - A badly formatted email A preview table highlights bad rows in red with the exact issue, so you can fix your file and re-upload. Only valid rows are imported.
Confirm the Import
When you're happy with the preview: 1. Make sure a Group is selected (the Import button stays disabled until it is). 2. Click Import N Valid Contacts. 3. Wait a moment while the contacts are added. A result summary then shows how many were Successfully imported, how many Failed, and how many Duplicates were skipped. The panel closes automatically and your new guests appear in the table — already enriched with bookings and stats as they start staying with you.
More in Contacts & CRM
Contacts & CRM — Your Guest Database
The Contacts page is your guest customer database (CRM). It collects everyone who has booked, messaged, or been added manually — with bookings, spending, and tags in one place.
Contact Profiles — The Full Guest View
Click any guest to open their profile drawer: contact details, lifetime stats, full booking history, loyalty tier, tags, and private staff notes — all in one slide-out panel.
Conversations & Shared Inbox — Talking to Guests
See where each guest came from, reach them on WhatsApp in one click, and understand how your guest messages flow in through the AI agent channels.