Connecting Your Property (Setup Tab)
Enter your channel manager access key, link your property, and run the first full sync so your dashboard and OTAs are in step.
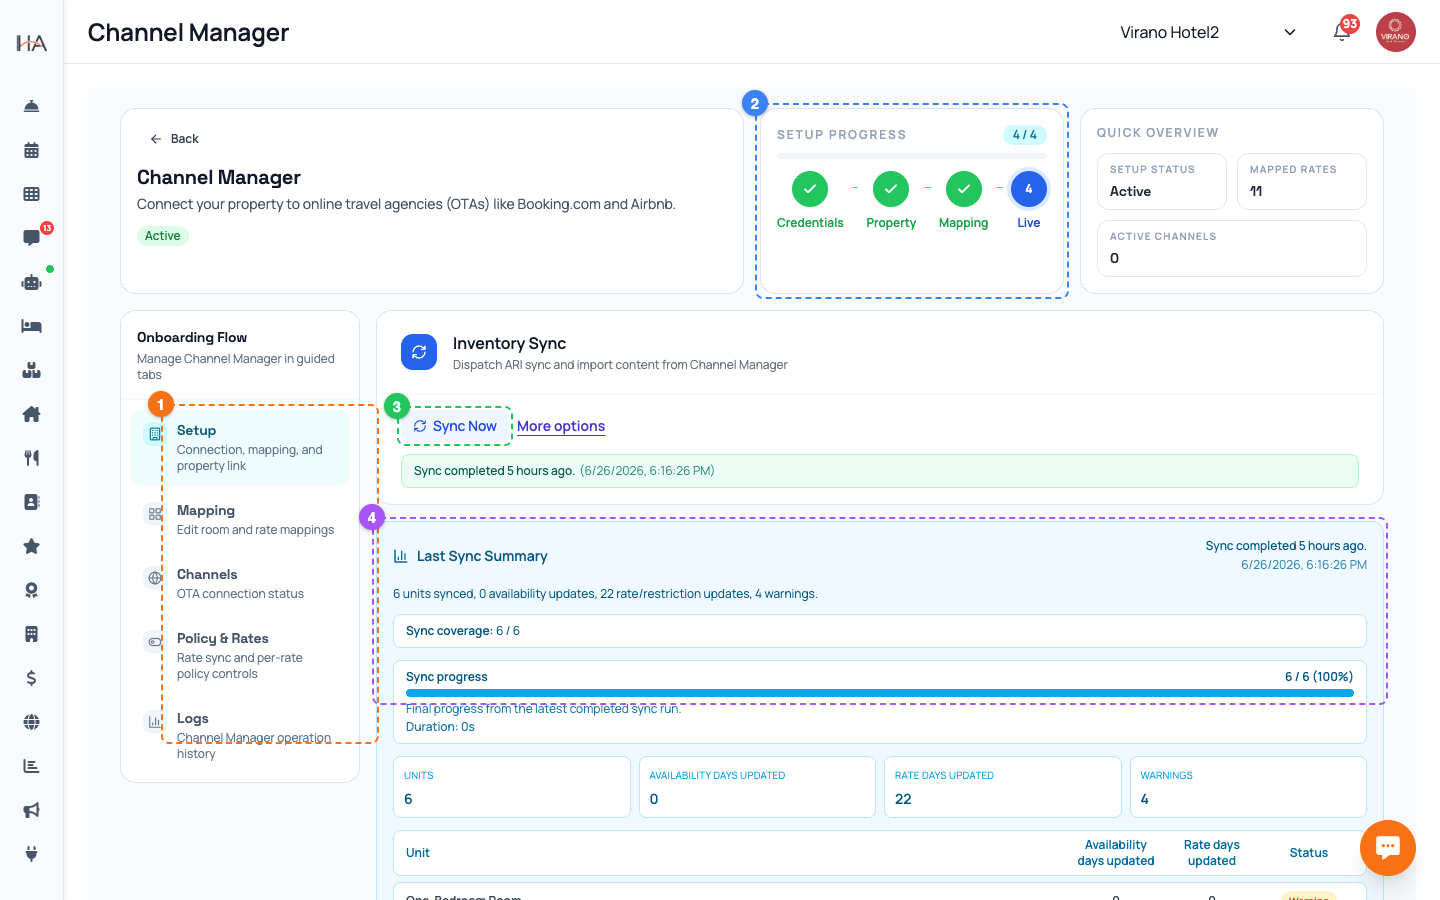
Open the Setup Tab
From Integrations, open the Channel Manager. If your property has never been connected, you will land on the connection screen automatically. If it is already connected, click the Setup tab at the top. The Setup tab is your control center for the connection itself. From here you can: - Enter or update your access key - See the connection status of your property - Turn the sync toggles on and off - Run a manual full sync - Disconnect the integration if you ever need to Make sure the correct property is selected at the top before you begin, especially if you manage more than one property.
Enter Your Access Key
The first step is to connect with your access key: 1. Click Connect to Channel Manager. 2. In the API Key field, paste the access key from your channel manager account. 3. Use the small eye icon beside the field if you want to reveal what you pasted and double-check it. 4. Click Validate & Continue. The system checks the key right away. If it is correct, you will see "API key validated" and move on to the next step. If you see "Invalid API key," copy the key again carefully (no extra spaces) and try once more. Keep this key private, as it controls access to your channels.
Link Your Property
After your key is validated, you connect your specific property: - If you already have a property set up in your channel manager account, choose it from the list so the dashboard links to it. - If you are starting fresh, choose the option to create a new property and the dashboard will set one up for you. Linking to the right property matters: this is the property whose room types, rate plans, and channels you will be working with. If you manage several properties, double-check you picked the one that matches the property selected at the top of the dashboard. Once linked, the dashboard saves the connection and moves you toward mapping.
Choose What to Sync
On the Setup tab you control what flows out to the OTAs using simple toggles: - Sync rates to OTA channels: when on, the prices you set in the dashboard are pushed to your channels. When off, OTA prices are not updated from your dashboard. - Availability sync: keeps your open and closed dates matched everywhere. For most properties you want these on so everything stays automatic. You can turn rate sync off temporarily if you want to manage prices directly on an OTA for a while. Remember to turn it back on, or your dashboard and channels can drift apart. You can fine-tune these choices per rate plan later in the Policy & Rates tab.
Run the First Full Sync
Once your property is linked and mapped, push everything to your channels for the first time: 1. On the Setup tab, find the Sync now button. 2. A confirmation appears: "Manual full sync pushes 500 days of availability and rates to your OTA channels. This is only allowed once every 24 hours." 3. Confirm to start. A Sync progress bar shows the work happening live, listing how many units are done. When it finishes you will see a per-unit result with how many availability and rate updates were sent. Because the full sync is heavy, you can only run it once every 24 hours. If you try again too soon, the dashboard shows how long until you can retry.
When You Do (and Don't) Need Sync Now
Day to day, you do not need the manual sync. The dashboard pushes your changes automatically as they happen, and a full safety sync runs every night. Use Sync now only for: - Right after first connecting or after big mapping changes - After turning a sync toggle back on - If you suspect an OTA is showing wrong prices or availability and want to force a complete refresh Because of the 24-hour limit, do not waste it. For a single price or date fix, just make the edit in your dashboard and let the automatic sync carry it across, or use the Quick Sync option in Policy & Rates for one rate plan.
Disconnecting (If You Ever Need To)
If you stop using a channel manager, you can disconnect: 1. On the Setup tab, find the Disconnect Channel Manager option. 2. Read the warning: "This removes the integration settings and stops all sync with OTAs. Existing bookings are not affected." 3. Click Disconnect to confirm, or Keep Connected to cancel. Disconnecting stops all price and availability sync, so your OTAs will no longer update from your dashboard. Your existing reservations stay safe and are not deleted. Only do this if you truly want to end the integration; for short pauses, it is better to just switch off the sync toggles instead.
More in Channel Manager
Channel Manager: One Two-Way Sync for All Your OTAs
Connect your property to Booking.com, Airbnb, Expedia and more through a single connection that keeps prices, availability, and bookings in sync automatically.
Mapping Units to Channel Room Types (Mapping Tab)
Match each of your units to a channel room type and rate plan so prices, availability, and bookings flow to the right place.
Activating Channels: Booking.com, Airbnb, Expedia (Channels Tab)
Connect each online travel agency using a secure one-time login so your mapped rooms start selling on Booking.com, Airbnb, Expedia and more.
Policy & Rates: Control What Reaches the OTAs
Fine-tune the prices, availability, and stay restrictions pushed to each OTA, per rate plan, and run quick or bulk updates.
Logs & Troubleshooting (Logs Tab)
Read the operation history, handle bookings that could not be matched automatically, and fix common sync issues.