Apple & Google Wallet Loyalty Cards
Design a branded digital loyalty card that guests add to their Apple or Google Wallet, with points that update live on their phone every time their balance changes.
Open the Wallet Card Tab
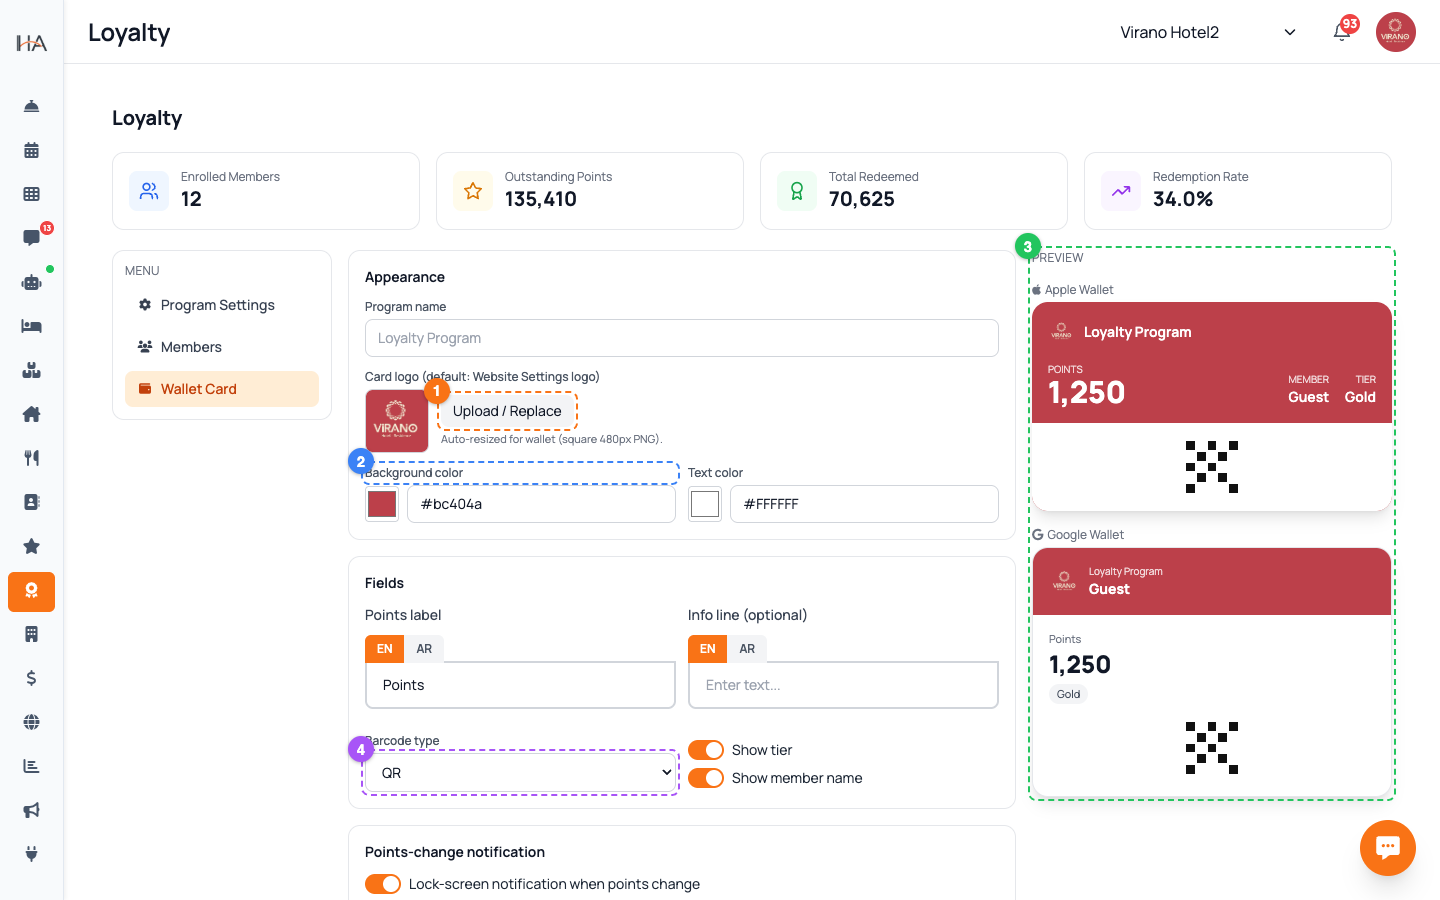
Go to Loyalty in the sidebar, then click the Wallet Card tab in the side menu. This is where you design the digital loyalty card guests save to their phone. The screen has two parts: - On the left, the design controls (Appearance, Fields, and notification settings) - On the right, a live preview of the card that updates as you make changes Make sure the right property is selected at the top, since each property has its own card design. There is nothing complicated to install — Hostel Agent handles the Apple and Google Wallet technical side for you. You just brand the card.
Set the Card Appearance
In the Appearance section, brand the card so it matches your property: - Program name — the title shown on the card (defaults to your loyalty program name) - Card logo — upload your logo, or leave it to use the logo from your Website Settings. It is auto-resized for wallets, so any clear square-ish image works - Background color — pick the card's color with the color picker or by typing a color code - Text color — choose a readable color for the text over your background Watch the live preview on the right; aim for strong contrast so the points and name are easy to read on a phone screen.
Configure the Card Fields
In the Fields section, decide what information appears on the card: - Points label — the word shown next to the number (for example "Points" or your own term). You can set it in both English and Arabic - Info line (optional) — a short extra line, such as a tagline or contact detail - Barcode type — choose QR, PDF417, or Code 128 (QR is the most familiar to guests) - Show tier — turn on to display the guest's loyalty tier on the card - Show member name — turn on to print the guest's name on their card Keep the card clean: a logo, the points, and maybe a tier is usually enough.
Turn On Live Points Notifications
The best part of a wallet card is that points update on the guest's phone by themselves. In the Points-change notification section: - Turn on "Lock-screen notification when points change" so the guest's phone shows a gentle alert each time their balance updates - When it is on, a Message field appears. Write the alert text in English and Arabic. Use the placeholder {points} where you want the new balance to appear (for example: "You now have {points} points!") This quiet, friendly nudge keeps your program top of mind without you sending a single message manually.
Save and Test the Card
When the design looks right in the preview, click Save to apply it. To see exactly what a guest gets, click Create test card. The system generates a sample card link you can copy: 1. Press Copy to copy the link 2. Open it on a phone (or scan its QR) 3. Tap the Add to Apple Wallet or Save to Google Wallet badge that appears The card lands in your phone's wallet just as a real guest's would. Test on both an iPhone and an Android phone if you can, so you know both versions look great.
Get the Card into Guests' Hands
Each enrolled guest gets their own personal card link. Share it so they can save the card to their phone: - Send the link in a WhatsApp message or your booking confirmation - Print or display a QR code at reception so guests can scan and save on arrival - Mention it at check-in: "Add our card to your wallet and earn points on every stay" Once saved, the card stays in their wallet and updates automatically — every booking earns points, the balance refreshes on their phone, and the notification (if enabled) reminds them you are waiting to welcome them back.
More in Marketing & Loyalty
Marketing Hub — Your Growth Toolkit
A guided tour of everything in the Marketing area: WhatsApp campaigns, discount coupons, the loyalty program, and guest reviews — and where to find each tool.
WhatsApp & Direct Campaigns
Build a target audience, write a message or pick an approved template, schedule it, and send a WhatsApp campaign to your guests.
Coupons & Discount Codes
Create percentage or fixed-amount discount codes, set their validity dates and usage limits, restrict them to certain units, and track how often they are used.
Loyalty Program Setup
Turn on your loyalty program, set how guests earn points and how much each point is worth, and add bonuses and tiers that keep guests coming back.
Reviews Management
See every rating and comment guests leave after their stay or housekeeping service, filter and sort them, and use the feedback to lift your ratings and win repeat bookings.