Managing Live Orders
Receive food orders, move them through the kitchen flow from New to On the Way, and collect payment when the order is completed.
Open the Orders Board
In Food & Beverage, click the Orders tab. At the top you can switch between three views: - Live — orders happening right now - Scheduled — orders set for a later time - History — completed and cancelled orders The Live view shows a board with three columns: New, Preparing, and On the Way. Each new order arrives as a card in the New column. A red "5 min" style warning appears on cards left untouched too long, so the kitchen never misses one. New orders also trigger a notification to the F&B team.
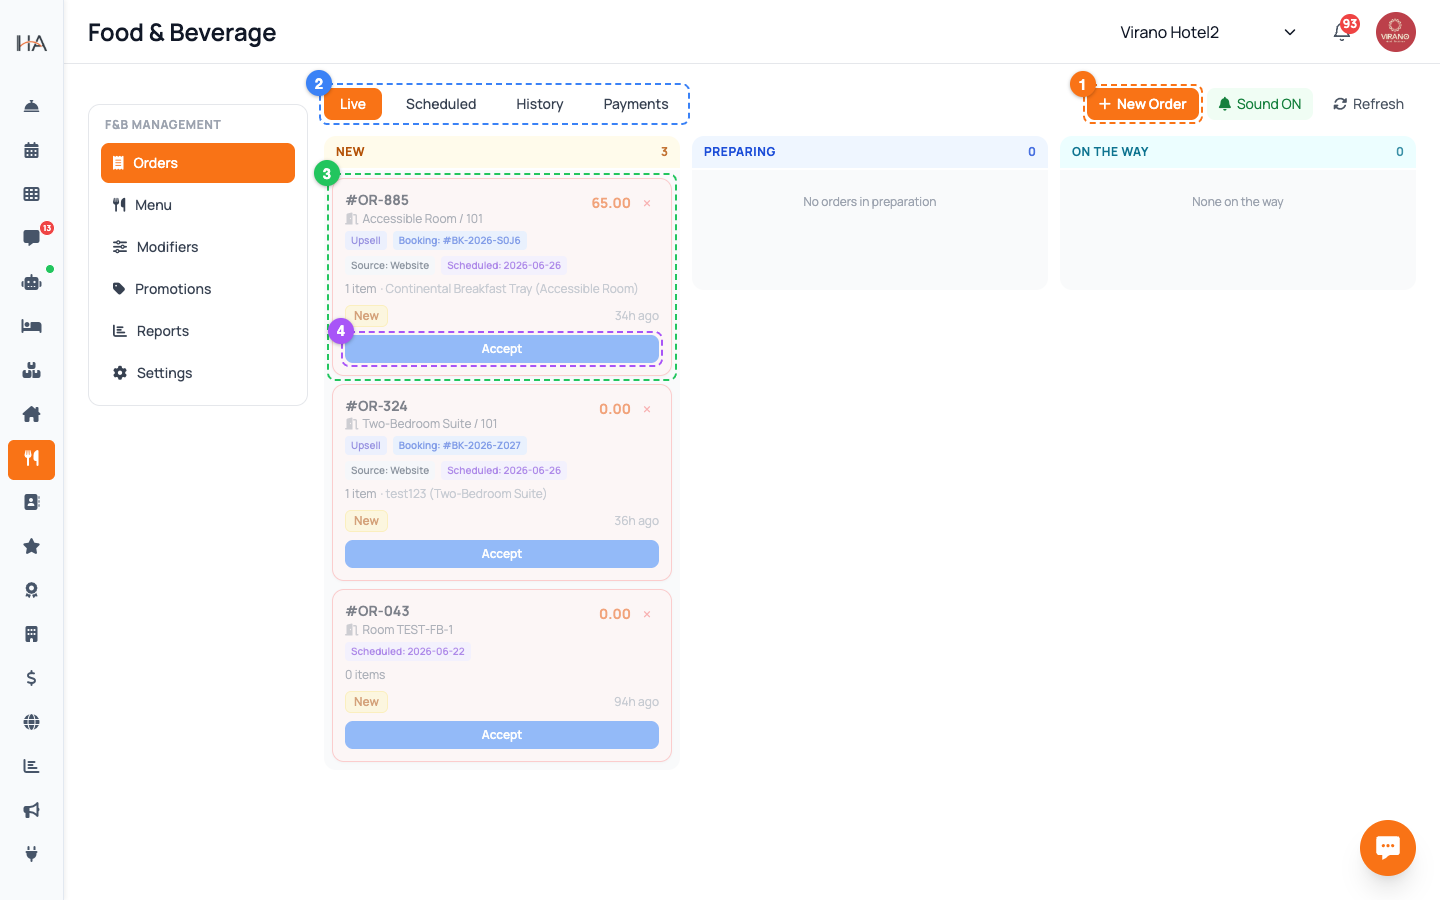
Accept or Decline a New Order
Click a card in the New column to open its detail panel. You will see the guest, the room or table, every item with its chosen modifiers, any guest notes, and the total. Then choose: - Accept — confirms the order and moves it into the kitchen flow - Decline — rejects it; you pick a reason (preset or custom) so the guest is told why Accepting starts the clock on preparation time. Always read the guest notes before accepting — they often contain allergies, "no onions", or delivery instructions the kitchen must follow.
Move the Order Through the Kitchen
After Accept, the order sits in Preparing. Open it and advance it one stage at a time using the single button at the bottom of the card: 1. On the Way — tap when the food leaves the kitchen for delivery 2. Mark Delivered — tap when the guest has received it You can also drag a card between the New, Preparing, and On the Way columns instead of opening it. The board always reflects the real kitchen state, so any staff member glancing at it knows exactly what is cooking and what is out for delivery.
Collect Payment & Complete
Orders paid online are already settled. For Cash on Delivery, Card on Delivery, or Room Charge, the order shows an "Awaiting Collection" badge until you confirm payment. When the guest has paid: 1. Open the order and click the orange Completed button 2. Confirm the payment method (cash, card, or room charge) 3. The order is marked paid and moves to History Room Charge orders are added to the guest's room bill automatically. Always collect or charge before completing, so the day's totals in Reports stay accurate.
Create a Walk-in or Phone Order
Staff can take orders that did not come from a guest's phone. In the Live view click New Order to open the point-of-sale panel: 1. Choose Room or Table / Walk-in, then type the room number or table label 2. Browse the menu, tap items to Add to Order, and set any modifiers — use the Combos filter to add bundles quickly 3. Add an order note if needed 4. Confirm to push it onto the board This is perfect for phone calls, the front desk, or guests ordering in person. The new order then flows through the same kitchen stages as any other.
Review History and Cancellations
Switch to the History view to see finished business. Each row shows whether the order was Delivered or Cancelled, the payment status, and the total. Use the filters at the top to: - Search by guest, room, or order number - Filter by status (Delivered or Cancelled) - Set a date range If an order was completed but you still see an "Awaiting Collection" payment note, you can mark it paid right from the History row. This view is your reliable record for end-of-shift reconciliation and answering any guest billing questions.
More in Room Service & F&B
Understanding Room Service & F&B
Learn how to set up and manage room service and food & beverage operations, including menus, ordering, and online payments.
Building Your Menu
Create categories and add menu items with prices, photos, calories, and availability so guests and staff can order food and drinks.
Modifiers & Combos
Add choices like size, extras, and spice level to your menu items, and bundle items together into combo deals to increase your average order value.
Guest QR Ordering
Let guests scan an in-room QR code, browse your menu on their own phone, and place a food order that lands straight on your Orders board.
F&B Settings & Reports
Configure how guests order, which payments you accept, kitchen hours, service charge and tax — then review sales analytics to see what is working.