Branding & Theme — Template, Colors, Logo & Hero
Make your booking website match your brand: pick a layout, set your color, upload a logo, and add hero images.
Open the Theme Tab
In Website Settings, click the Theme tab on the side menu. This is where all the visual branding lives, from top to bottom: - Website Layout (the overall template) - Carousel Images (the rotating hero photos on your home page) - Logo and Theme Color - Website Title and Description - A short About summary and your Frequently Asked Questions Work your way down the page. Remember to confirm the correct property is selected at the top of the dashboard first — branding is saved separately for each property.
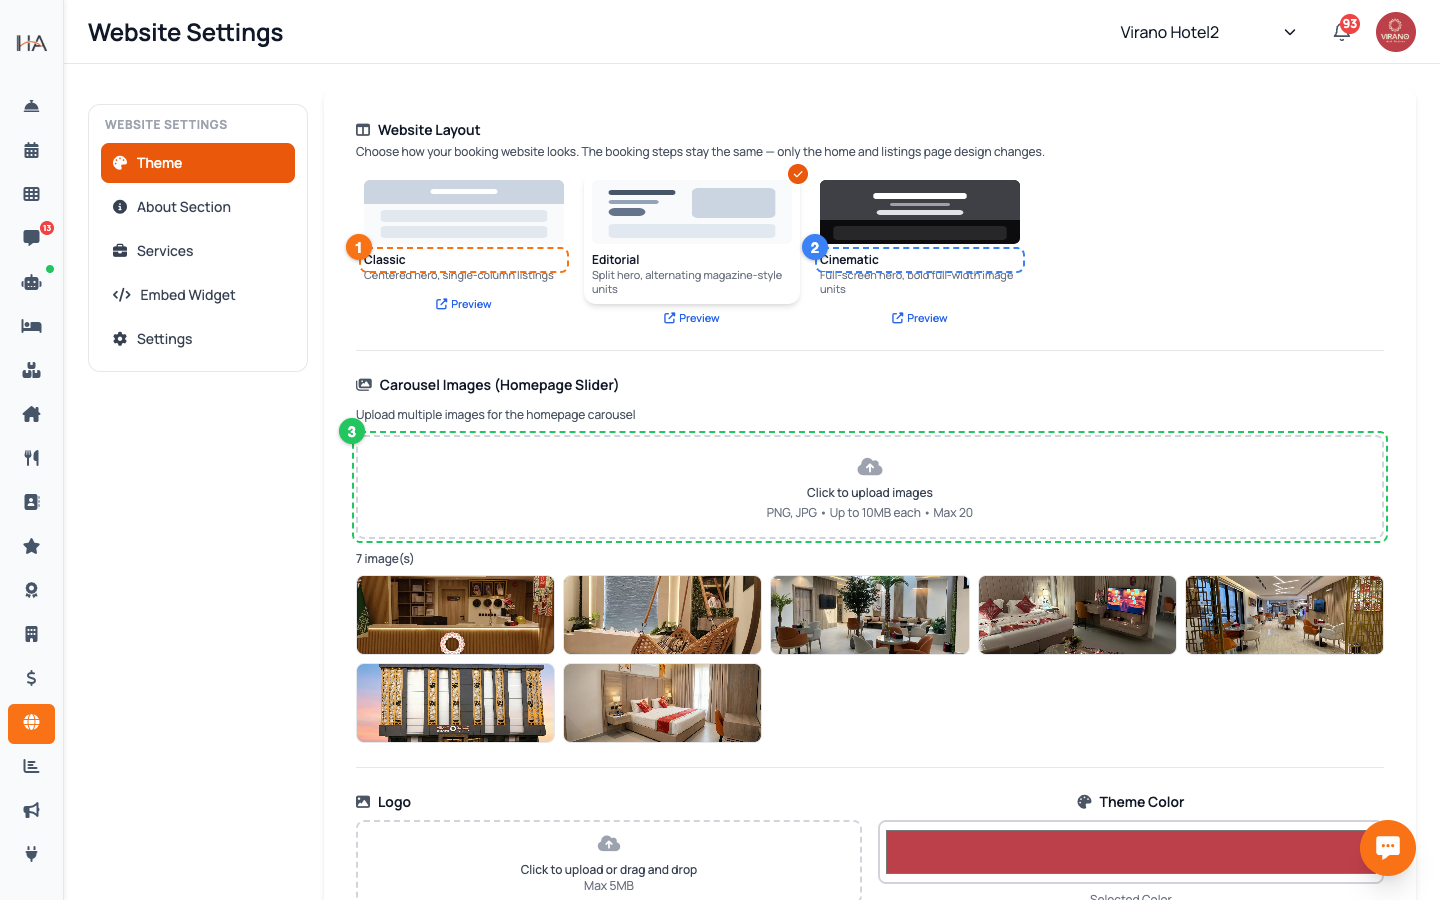
Pick a Website Layout
Under Website Layout, choose how your home and listings pages look. There are three designs, each shown with a small preview thumbnail: - Classic — a centered hero with a single-column list of units. Clean and simple. - Editorial — a split hero with units alternating in a magazine style. - Cinematic — a full-screen hero with bold, full-width image units. Click a design to select it; the orange checkmark shows your active choice and it saves instantly. The booking steps stay identical across all three — only the home and listings design changes. Use the Preview link under each card to view it live before deciding.
Add Hero / Carousel Images
The carousel is the large set of rotating photos at the top of your home page — your guests' first impression. To add them: 1. Under Carousel Images, click the dashed upload box ("Click to upload images"). 2. Select one or several photos at once. They upload and save automatically. 3. Uploaded photos appear in a grid below, with a counter showing how many you have. Tips: - Use bright, high-quality landscape photos of your property. - Each file must be under 10 MB; you can keep up to 20 images. - To remove one, hover over it and click the red trash icon.
Upload Your Logo
Your logo appears at the top of your booking website. To set it: 1. In the Logo card, click the dashed upload area ("Click to upload"). 2. Choose your logo image file. Keep it under 5 MB. 3. It uploads, saves, and shows a small preview right away. Best results: - Use a logo with a transparent background (PNG) so it sits cleanly on any color. - A wide or square logo works better than a very tall one. To replace the logo, upload a new one over it. To remove it entirely, hover over the preview and click the red trash icon — your site then shows your property name as text instead.
Set Your Theme Color
The theme color is the main accent color used for buttons and highlights across your website. To set it: 1. In the Theme Color card, click the color swatch to open the color picker. 2. Choose your brand color. The exact color code appears below the swatch so you can match your brand precisely. 3. Click Save to apply it (or Cancel to discard). Choose a color with enough contrast so white text on your buttons stays easy to read. A strong, on-brand accent makes your "Book Now" buttons stand out and encourages guests to complete their reservation.
Write Your Website Title & Description
Below the logo and color sit two text blocks that label your site for guests: - Website Title — your property's headline name (for example "Virano Hotel — Riyadh"). - Website Description — a short welcoming sentence about your property. For each one: 1. Click the Edit link next to the heading. 2. Fill in both the English (EN) and Arabic (AR) fields. If you only complete one language, the system fills the other so nothing appears blank to guests. 3. Click Save. Keep the title short and the description warm and inviting — these are among the first words guests read.
More in Website & Booking
Your Booking Website — Overview
Understand the Website Settings page and how your free, guest-facing booking website works.
Website Content — About, Gallery, Services & FAQs
Fill your website with the words and details guests want: an about story, photos, featured services, and answers to common questions.
Domain & Subdomain — Your Web Address
Get your free x.hostel-agent.com address, or connect your own custom domain to your booking website.
Booking Engine & Policies — Language, Currency & Guest Info
Control how the booking flow behaves for guests: default language, the currency they pay in, the location map, and the policies they see.
Sharing Your Website — Links & Embed Widget
Make your booking website easy to find and share: set a clear title and description, copy your live link to post anywhere, and embed a booking button on your own site.