Manager Approval PIN Gate — Anti-Theft for Sensitive Front-Desk Actions
Require a manager's PIN before front-desk staff can perform sensitive actions like refunds, cancellations, and discounts. Set it up per property and choose who approves.
What the Manager Approval Gate Does
The Manager Approval gate is an anti-theft control. When it is ON, certain sensitive actions cannot be completed at the front desk until a manager's PIN is entered. This protects your revenue against mistakes and fraud — for example, a staff member cannot quietly issue a refund or apply a big discount without a manager's PIN. The setting is per property group, so you can require approval at one property while leaving another off. You manage it from the Manager Approval tab inside Team Management.
Open the Manager Approval Tab
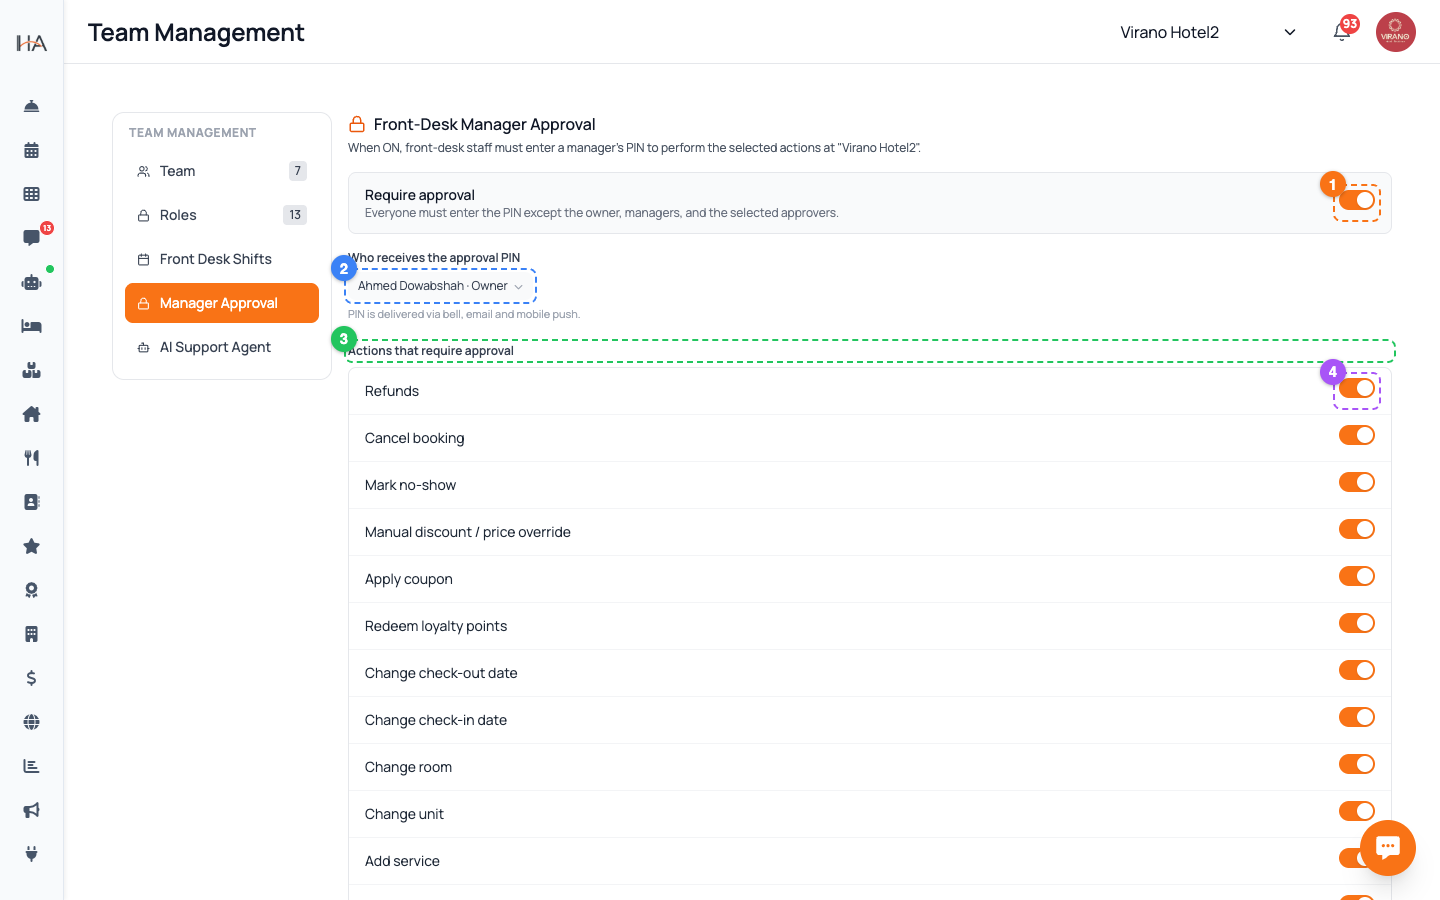
Go to Settings, open Team Management, then click Manager Approval in the left sub-menu. A couple of things to know: - This tab is only visible to the account owner and to managers whose role includes managing the team. If you don't see it, your role doesn't allow it. - The settings always apply to the property group currently selected at the top of the dashboard. If you manage several properties, switch to the right one first. At the top you'll see the property name and a short explanation of how the gate works for that property.
Turn On Require Approval
Find the Require approval master switch near the top of the tab and turn it ON. Once it's on, additional settings appear: who receives the PIN and which actions are gated. Below the switch a note reminds you of the rule: - Everyone must enter the PIN to perform a gated action, EXCEPT the account owner, managers, and the approvers you select. In other words, your regular reception staff will be prompted for a PIN, while the people you trust as approvers (and the owner/managers) are exempt and won't be slowed down.
Choose Who Receives the Approval PIN
In the Who receives the approval PIN selector, pick the managers who are allowed to approve. You can choose one or several people from your owner and active team members. Key points: - If you select no one, the PIN defaults to the account owner — a warning reminds you of this. - When staff request approval, the PIN is delivered to the selected approvers via the in-app bell, email, and mobile push notification. - The people you select here are automatically exempt from being asked for a PIN themselves. Choose approvers who are usually reachable during shifts so the front desk is never blocked for long.
Pick Which Actions Require Approval
Below the recipients, the Actions that require approval list lets you switch a PIN check on or off for each sensitive action individually: - Refunds - Cancel booking - Mark no-show - Manual discount / price override - Apply coupon - Redeem loyalty points - Change check-in / check-out date - Change room or unit - Add service - Post / void charge - Calendar price override By default the highest-risk actions (refunds, cancellations, no-show, discounts, coupons, and loyalty redemptions) are locked. Toggle each one to match your property's policy.
Save and Test the Gate
When you're happy with the switch, recipients, and gated actions, click Save changes at the bottom right. A confirmation appears. To test it: 1. Have a regular reception staff member try one of the gated actions (for example, a refund). 2. They should be asked to enter a manager's PIN before it goes through. 3. An approver receives the PIN on their bell, email, and mobile push. 4. Once the correct PIN is entered, the action completes. If something doesn't prompt as expected, recheck that the master switch is ON, that the action is toggled on, and that you've saved.
More in Settings & Team
Property Settings — Groups, Properties & Units
Manage your property groups and the bookable units inside them. This is where you add new properties, edit details, and control which units are available.
Team Management — Invite Members, Assign Roles & Permissions
Invite your staff, control exactly what each person can do, and manage roles. Use predefined roles for quick setup or build custom roles for fine-grained control.
Payment Methods — Enable Gateways for Online Bookings
Choose how guests pay on your booking website: card processors (Moyasar, Tap), Buy Now Pay Later (Tabby, Tamara), Apple Pay, bank transfer, or pay on arrival.
Taxes (VAT) & ZATCA E-Invoicing
Set up VAT on your bookings and connect Saudi ZATCA Phase 2 e-invoicing so your invoices are officially compliant.
Account Settings & Security
Update your profile, change your password, and protect your login with two-factor authentication and trusted devices.
Subscription, Plan & Wallet Balance
See your current plan and its features, track unit usage, renew your subscription, and review your transactions and invoices.