Property Settings — Groups, Properties & Units
Manage your property groups and the bookable units inside them. This is where you add new properties, edit details, and control which units are available.
Open Property Settings
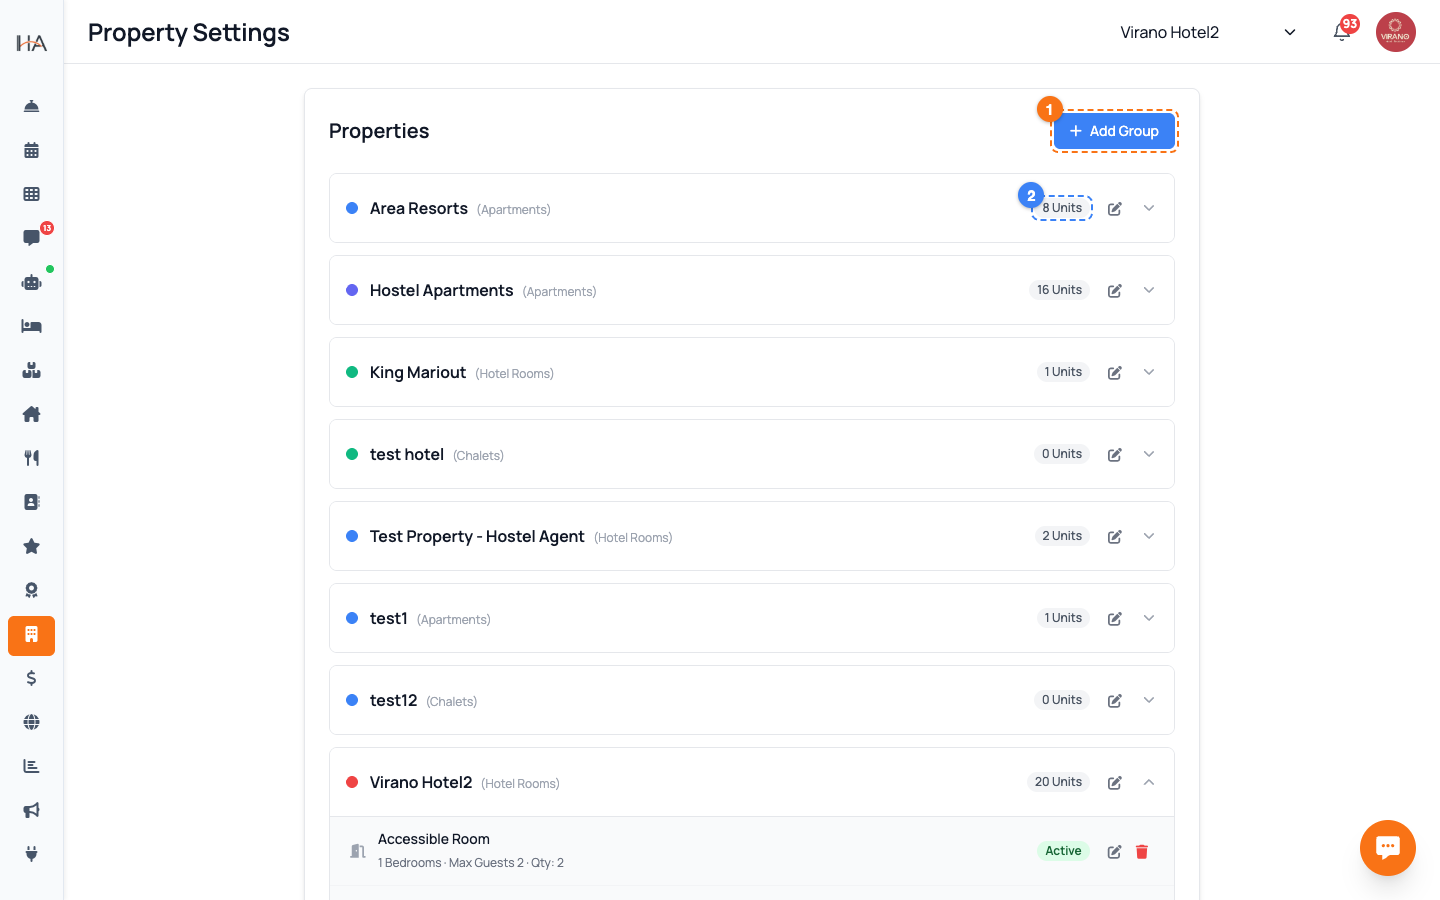
Go to Settings and open Property Settings. The page shows a list called Properties — each row is one of your property groups (for example a hotel, an apartment building, or a chalet resort). Each group row shows: - A small colored dot that identifies the group - The group name and its type (Apartments, Hotel Rooms, or Chalets) - A badge showing how many units it contains - An edit (pencil) icon - A chevron arrow on the right to expand or collapse it Click anywhere on a group row to expand it and see the units inside.
Add a New Property Group
To create a new property, click the Add Group button at the top right of the page. A side panel opens where you fill in the property details: 1. Group name (the name guests and your team will see) 2. Property type — Apartments, Hotel Rooms, or Chalets 3. Commercial / business details, phone, and address 4. Optional logo and website subdomain Fill in the fields and save. The new group appears in the list and becomes the active group. Note: On the Starter plan you can have only one property group. If you are on Starter and already have a group, the Add Group button is disabled and a message explains the limit.
Edit Property Group Details
To update an existing group, click the pencil (edit) icon on its row. The same side panel opens with the current details filled in. Here you can update: - The group name and type - Commercial name, phone, and full address - Logo and the website subdomain used for the booking page - Bank details where relevant Keeping the commercial name, phone, and address complete is important — these details are used on guest invoices and for tax records. Make your changes and save; a confirmation appears and the list updates instantly.
Add a Unit to a Group
Expand a group by clicking its row, then click Add New Unit at the bottom of the unit list. A side panel opens to set up the bookable unit: 1. Unit name (in English and Arabic) 2. Bedrooms and bed configuration 3. Maximum guests (capacity) 4. Quantity — for identical rooms you can set how many of the same unit exist 5. Photos and amenities 6. Daily prices (at least 7 days of pricing are needed for the unit to be bookable) When you save, the unit appears under the group, and the group's unit count badge updates.
Edit or Deactivate a Unit
Each unit row inside an expanded group shows its key details: bedrooms, max guests, quantity, and a status badge (Active in green, or Inactive in red). - To edit a unit, click the pencil (edit) icon on its row. You can change its name, capacity, photos, prices, and amenities, and switch it between Active and Inactive. - An Inactive unit stays in your system but is hidden from new bookings — useful when a room is under maintenance. Always double-check capacity (max guests) and bed setup, because these directly affect what guests see and can book online.
Delete a Unit Safely
If a unit no longer exists, you can remove it. Inside the expanded group, click the red trash icon on the unit's row. A confirmation dialog appears asking you to confirm the deletion. Important tips before deleting: - Deleting is permanent — the unit is removed from your property. - If the unit only needs to be temporarily off the market, set it to Inactive instead of deleting it. - Only team members whose role allows deleting units will see the trash icon. Click the confirm button in the dialog to finish, or Cancel to keep the unit.
Understand Permissions on This Page
What you can do on the Property Settings page depends on your role: - Owners and Operations Managers can add groups, edit details, and add, edit, or delete units. - Other roles may only see the list, or may be able to edit units but not create or delete groups. - If you do not have access at all, the page shows a message saying you do not have permission to access property settings. If a button (like Add Group, Add New Unit, or the delete icon) is missing or greyed out, it usually means your role does not include that permission. Ask your account owner to adjust your role under Team Management.
More in Settings & Team
Team Management — Invite Members, Assign Roles & Permissions
Invite your staff, control exactly what each person can do, and manage roles. Use predefined roles for quick setup or build custom roles for fine-grained control.
Manager Approval PIN Gate — Anti-Theft for Sensitive Front-Desk Actions
Require a manager's PIN before front-desk staff can perform sensitive actions like refunds, cancellations, and discounts. Set it up per property and choose who approves.
Payment Methods — Enable Gateways for Online Bookings
Choose how guests pay on your booking website: card processors (Moyasar, Tap), Buy Now Pay Later (Tabby, Tamara), Apple Pay, bank transfer, or pay on arrival.
Taxes (VAT) & ZATCA E-Invoicing
Set up VAT on your bookings and connect Saudi ZATCA Phase 2 e-invoicing so your invoices are officially compliant.
Account Settings & Security
Update your profile, change your password, and protect your login with two-factor authentication and trusted devices.
Subscription, Plan & Wallet Balance
See your current plan and its features, track unit usage, renew your subscription, and review your transactions and invoices.